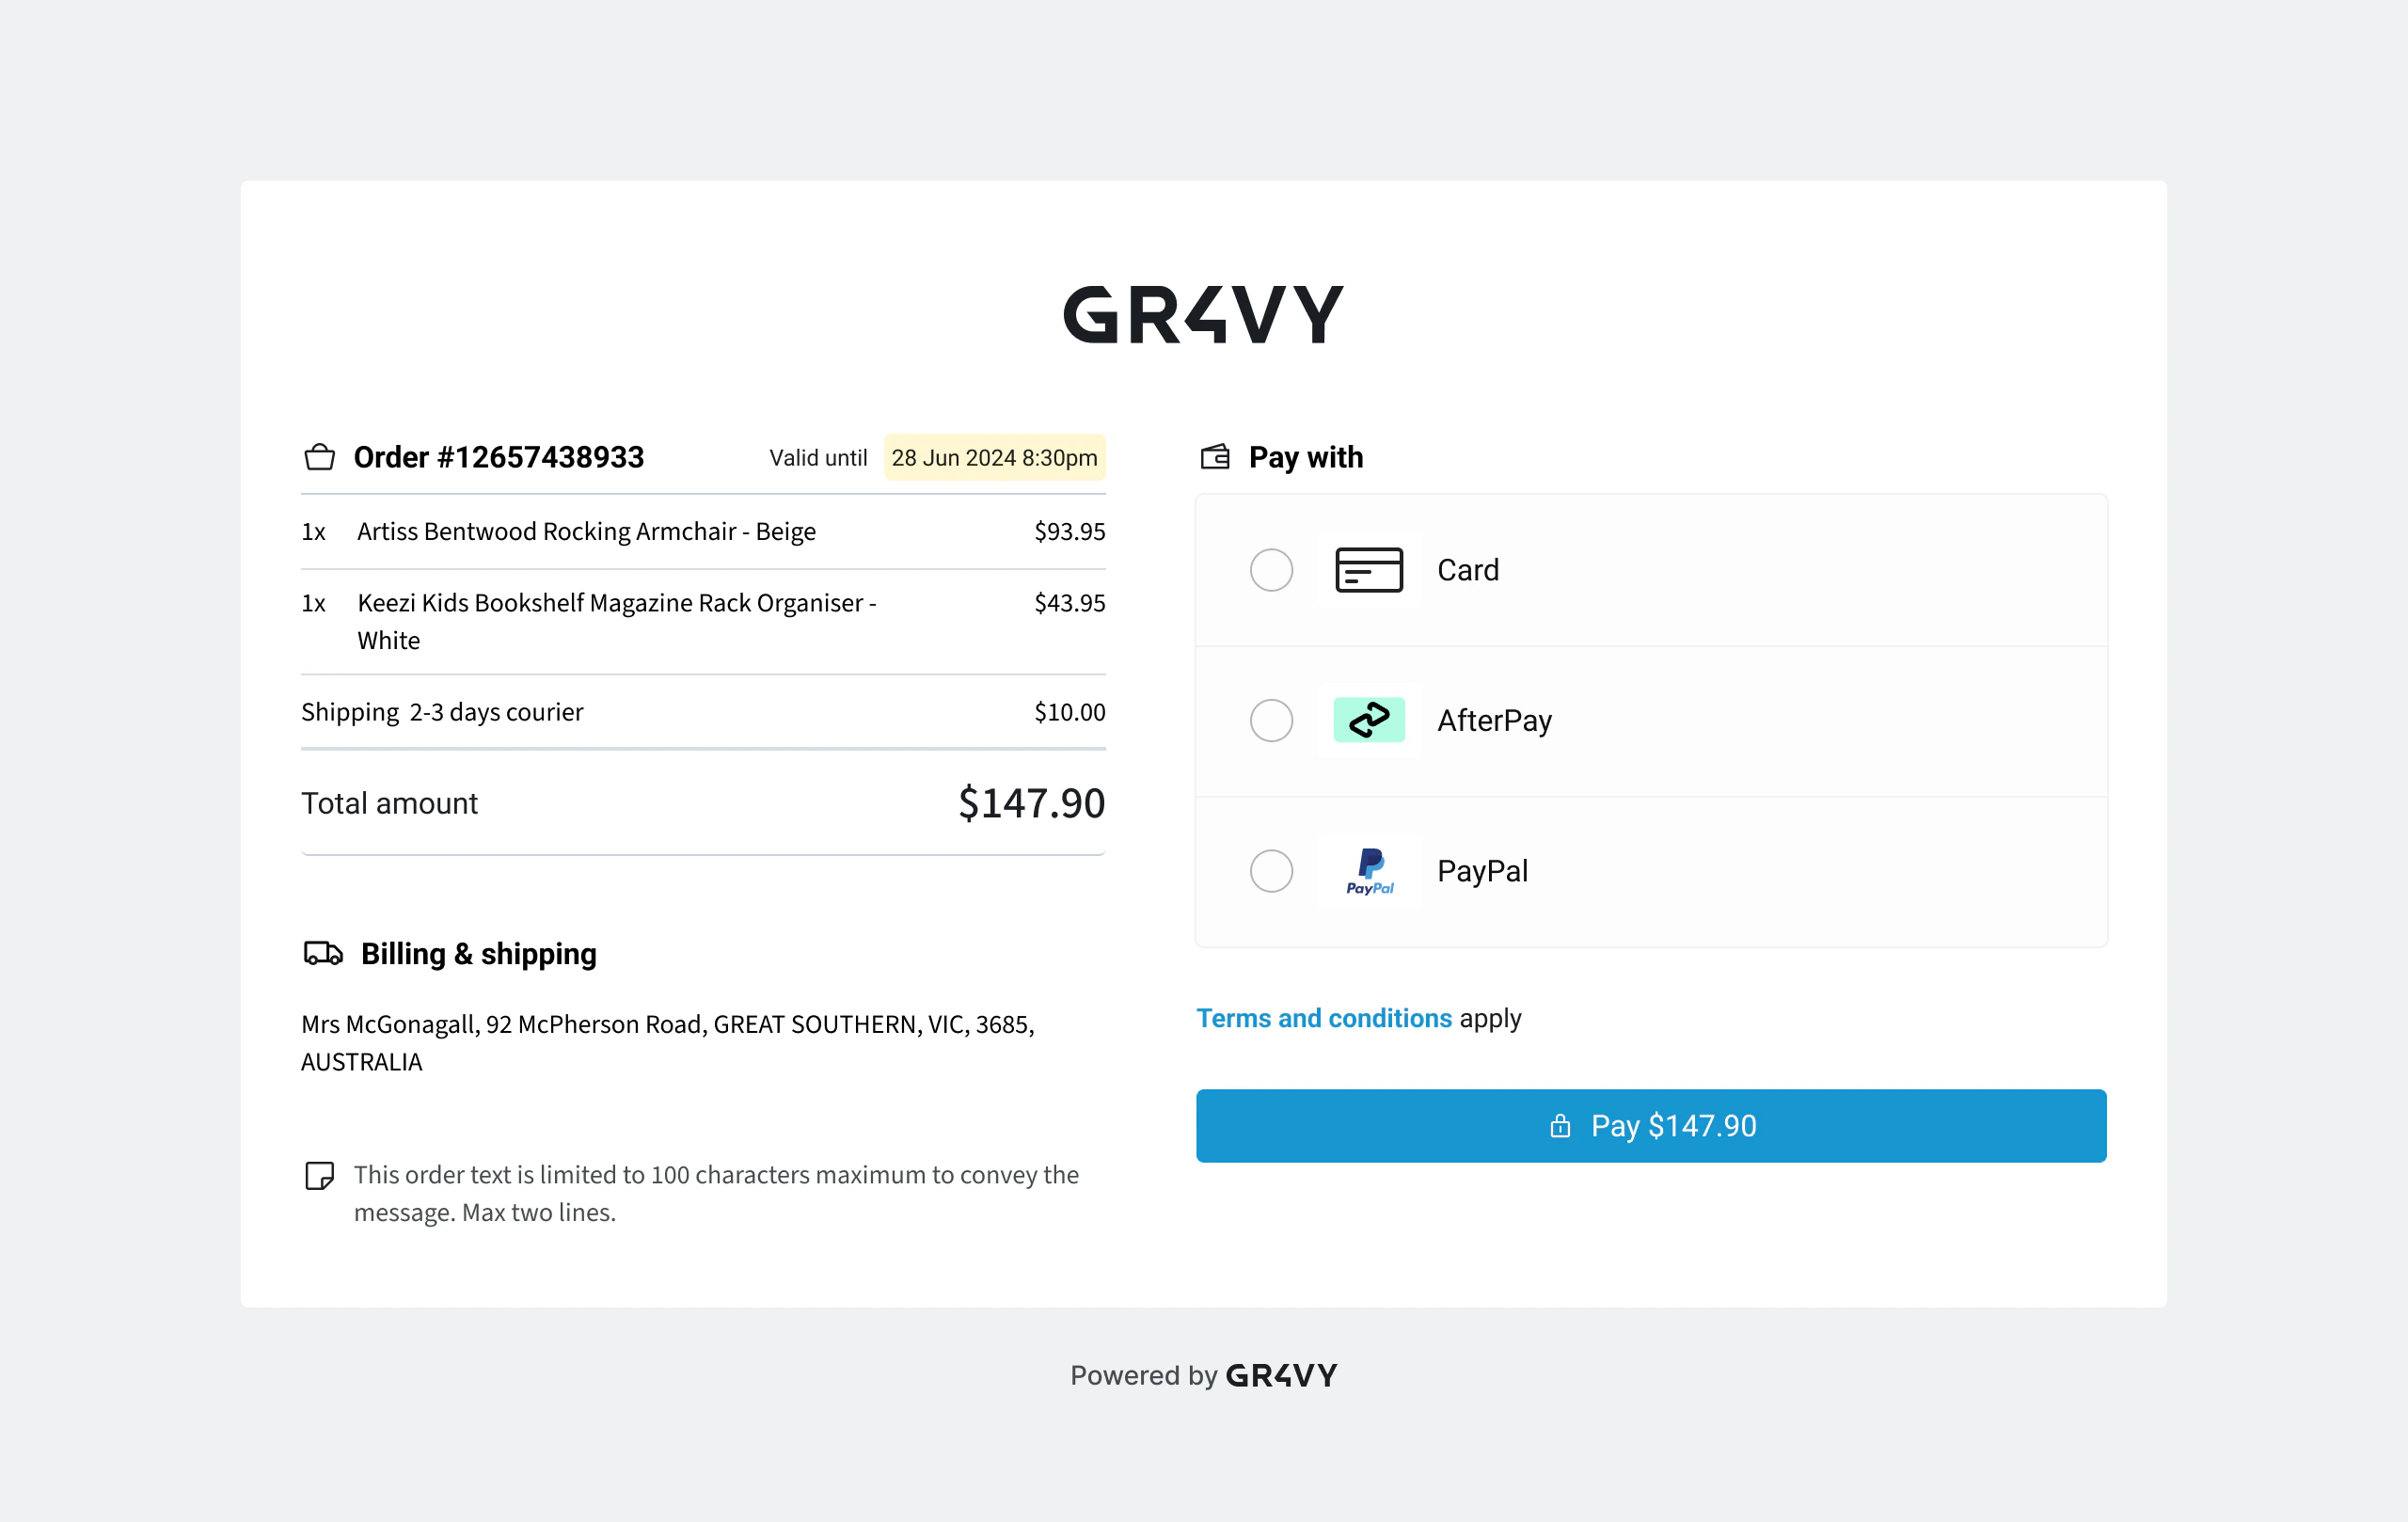
Set up payment links to accept payments from your customers.
Payment links allows generation of a link, to send to a customer via email/sms/etc,
and then have the customer pay without the need to host a custom checkout.
Creating a payment link
Use the payment links endpoint to create a payment link with the data displayed on the hosted page. The payment links API endpoint makes it
easy to get create a new payment link.
{ "currency":"AUD", "country":"AU", "amount":1000, "metadata":{ "TypeOfPayment":"purchase", "Carbon_FootPrint":"10" }, "cart_items":[ { "name":"Aloe", "unit_amount":1000, "quantity":1, "sku":"aloe" } ], "merchant_banner_url":"https://susies.store/logo.svg", "merchant_color":"#cf6b6b", "merchant_name":"Susie's Store", "merchant_url":"https://susies.store", "merchant_message":"Thanks for your purchase at Susie's Store!", "merchant_terms_and_conditions_url":"https://susies.store/terms-and-conditions", "return_url":"https://susies.store/success"}
The payment link includes the expires_at, status, and other useful information
used by the hosted page. Make note of the returned id as it is used in the next step.
The hosted page passes these fields to Embed, which uses them to create the transaction:
amount, currency, and country (required)
buyer
buyer_id
cart_items
connection_options
external_identifier
installment_count
intent
metadata
payment_source
statement_descriptor
store
These fields control the hosted page itself:
expires_at sets when the link expires. See expiration.
locale sets the language of the page.
return_url is where the page sends the customer once the transaction is created, whatever its outcome. Gr4vy appends gr4vy_transaction_id and gr4vy_transaction_status. Without it, the page shows its own confirmation screen.
merchant_name, merchant_url, merchant_banner_url, merchant_color, merchant_message, merchant_terms_and_conditions_url, and merchant_favicon_url brand the page. When you set both merchant_name and merchant_url, the success and expired screens show a Return to link with your merchant name that opens merchant_url.
See the API reference for the full list of fields.By creating a payment link, send it to the customer to complete the payment.
Set the intent
intent sets the initial state of the transaction that the payment link creates. It accepts authorize, which is the default, capture, or prefer_authorize.prefer_authorize authorizes the payment where the payment service supports delayed capture, and captures it where it doesn’t. It’s the payment link equivalent of the Embed preferAuthorize option. The spelling differs on purpose: the API uses snake_case, so the payment link value is prefer_authorize.A payment link’s intent and its transaction’s intent are different things:
A transaction created from a prefer_authorize link always reports its intent as authorize or capture, never prefer_authorize.
To send airline travel data to the payment service, set the airline object when you create the payment link. It uses the same schema as airline on create transaction, so it can describe several passengers and several flight legs.
When the customer pays the link, Gr4vy copies the airline data onto the transaction and sends it to the payment service at authorization, including after 3DS. If you capture later without an airline object, Gr4vy sends the stored airline data with the capture.
The airline data on the payment link takes precedence over any airline object sent when the transaction is created.
You can’t change the airline data after you create the payment link.
Get payment link and list payment links return the airline object. The hosted page never receives or shows it, so the customer doesn’t see passenger details.
Connections that accept airline data, such as Nuvei and Worldline TravelHub, forward it to the payment service. Other connections ignore it.
Limit the payment methods on a link
Payment links don’t take a list of payment methods to show or hide. To control which methods
appear, set a metadata key on the payment link, for example {"link_type": "invoice"}, and add a
rule to the Checkout Flow with a
Metadata condition on that key. The rule then selects the payment options for those links. If no
rule matches, the page shows all configured and active payment options. Checkout Flow rules apply
to the whole merchant account, not just to payment links.
Storing a payment method
A payment link can be used to securely store a payment method against a buyer’s
profile. To do this, you need to pass both the buyer_id and store
parameters.When store is set to true, the buyer_id of an existing buyer must also be
provided. After the payment is completed, the payment method used is
stored and associated with that buyer.When store is true, the payment link page only shows payment methods that can be stored,
so some of the options you’ve configured might not appear.Currently, it is not possible to use a buyer’s existing stored payment methods
to complete a payment link.
Zero-amount links
You can create a payment link with an amount of 0. With store set to true, the link stores the buyer’s payment method. With store set to false, the link only verifies the payment method and doesn’t store it. A zero-amount link only offers payment services that support zero-amount authorization.
When buyer_id is provided, the URL of the payment link should be treated as a secret as
it allows anyone the ability to manage payment methods for the associated buyer.
Find a payment link’s transactions
To list the transactions created through a payment link, call list transactions with the payment_link_id query parameter set to the id of the payment link.
GET /transactions?payment_link_id=09e90ace-a746-41f5-88d2-8b16335ded97
In the dashboard, go to Transactions > Payment links and open the payment link to see its transactions.
Was this page helpful?
{"docsConfig":{"theme":"palm","$schema":"https://mintlify.com/docs.json","name":"ANGL Pay","colors":{"primary":"#538c53","light":"#538c53","dark":"#538c53"},"logo":{"light":"https://mintcdn.com/anglpay/HiPPSlxu3-bcuR21/assets/logos/light.svg?fit=max\u0026auto=format\u0026n=HiPPSlxu3-bcuR21\u0026q=85\u0026s=3288ab19867d2196ca039bfb1bfffa8e","dark":"https://mintcdn.com/anglpay/HiPPSlxu3-bcuR21/assets/logos/dark.svg?fit=max\u0026auto=format\u0026n=HiPPSlxu3-bcuR21\u0026q=85\u0026s=bf282ba2b20b3c730d172bfbbf20fa9d"},"favicon":"https://mintcdn.com/anglpay/jAXWh018x28shKDi/assets/favicon.png?fit=max\u0026auto=format\u0026n=jAXWh018x28shKDi\u0026q=85\u0026s=5b6a8ce50bb793b612160b4e8e258fe2","api":{"playground":{"display":"simple"},"examples":{"defaults":"required","languages":["csharp","go","java","php","python","javascript","curl"]},"mdx":{"auth":{"method":"bearer"},"server":["https://api.sandbox.anglpay.gr4vy.app","https://api.anglpay.gr4vy.app"]}},"navbar":{"links":[{"icon":"bell","href":"https://status.gr4vy.com","label":"Status"},{"icon":"github","href":"https://github.com/gr4vy","label":"GitHub"}],"primary":{"type":"button","label":"About ANGL Pay","href":"mailto:[email protected]"}},"footer":{"socials":{"website":"https://anglpay.com"}},"styling":{"eyebrows":"breadcrumbs","codeblocks":"system","latex":true},"integrations":{"gtm":{"tagId":"G-9CX4E9QWKQ"}},"contextual":{"options":["chatgpt","claude","copy","view"],"display":"header"},"interaction":{"drilldown":true},"navigation":{"pages":[]}},"deployment":{"deploymentMetadataValue":{"subdomain":"anglpay","hasAudioNarration":false,"actualSubdomain":"anglpay","customDomains":["docs.anglpay.com"],"gitSource":{"type":"github","owner":"gr4vy","repo":"anglpay-docs-mintlify","deployBranch":"main","contentDirectory":"","isPrivate":true,"mountPath":"","label":""},"feedback":{"thumbs":true,"edits":true},"entitlements":{"AI_CHAT":{"status":"DISABLED"}},"buildId":"6af6fcf307e6a796f0fd8de8","clientVersion":"0.0.4131","searchFilterCounts":[{"language":"default","tag":"Build","count":172},{"language":"default","tag":"API Reference","count":171},{"language":"default","tag":"Connections","count":168},{"language":"default","tag":"Methods","count":141},{"language":"default","tag":"Features","count":87},{"language":"default","tag":"Integration guides","count":76},{"language":"default","tag":"Banking","count":46},{"language":"default","tag":"Dashboard","count":45},{"language":"default","tag":"Other","count":39},{"language":"default","tag":"Embed","count":38}]},"assistantConfig":{},"basePath":"","hasChatPermissions":false,"hasWebMcpPermissions":false,"toggles":[{"name":"kill-isr","enabled":true,"variant":{"name":"disabled","enabled":false,"feature_enabled":true},"impressionData":false},{"name":"custom-rbac-roles","enabled":true,"variant":{"name":"disabled","enabled":false,"feature_enabled":true},"impressionData":false},{"name":"agent-mintlify-slack","enabled":true,"variant":{"name":"disabled","enabled":false,"feature_enabled":true},"impressionData":false},{"name":"agent-integrations-settings","enabled":true,"variant":{"name":"disabled","enabled":false,"feature_enabled":true},"impressionData":false},{"name":"rbac-expansion","enabled":true,"variant":{"name":"disabled","enabled":false,"feature_enabled":true},"impressionData":false},{"name":"automations-pr-grouping","enabled":true,"variant":{"name":"disabled","enabled":false,"feature_enabled":true},"impressionData":false},{"name":"custom-prefix","enabled":true,"variant":{"name":"disabled","enabled":false,"feature_enabled":true},"impressionData":false},{"name":"analytics-v7","enabled":true,"variant":{"name":"disabled","enabled":false,"feature_enabled":true},"impressionData":false},{"name":"user-flows-analytics","enabled":true,"variant":{"name":"disabled","enabled":false,"feature_enabled":true},"impressionData":false},{"name":"no-publish-flow","enabled":true,"variant":{"name":"disabled","enabled":false,"feature_enabled":true},"impressionData":false},{"name":"workos-onboarding","enabled":true,"variant":{"name":"disabled","enabled":false,"feature_enabled":true},"impressionData":false},{"name":"snapshot-serving-live","enabled":true,"variant":{"name":"disabled","enabled":false,"feature_enabled":true},"impressionData":false},{"name":"stripTemperatureMiddleware","enabled":true,"variant":{"name":"disabled","enabled":false,"feature_enabled":true},"impressionData":false},{"name":"support-platform-pylon-zendesk","enabled":true,"variant":{"name":"disabled","enabled":false,"feature_enabled":true},"impressionData":false},{"name":"snapshot-serving","enabled":true,"variant":{"name":"disabled","enabled":false,"feature_enabled":true},"impressionData":false},{"name":"instant-rollback","enabled":true,"variant":{"name":"disabled","enabled":false,"feature_enabled":true},"impressionData":false},{"name":"granular-notifications-server","enabled":true,"variant":{"name":"disabled","enabled":false,"feature_enabled":true},"impressionData":false},{"name":"granular-notifications","enabled":true,"variant":{"name":"disabled","enabled":false,"feature_enabled":true},"impressionData":false},{"name":"automations-fable","enabled":true,"variant":{"name":"disabled","enabled":false,"feature_enabled":true},"impressionData":false},{"name":"fixed-ai-action-pricing","enabled":true,"variant":{"name":"disabled","enabled":false,"feature_enabled":true},"impressionData":false},{"name":"automation-resolve-merge-conflict","enabled":true,"variant":{"name":"disabled","enabled":false,"feature_enabled":true},"impressionData":false},{"name":"scoped-publishing","enabled":true,"variant":{"name":"disabled","enabled":false,"feature_enabled":true},"impressionData":false},{"name":"mintql","enabled":true,"variant":{"name":"disabled","enabled":false,"feature_enabled":true},"impressionData":false},{"name":"page-level-analytics","enabled":true,"variant":{"name":"disabled","enabled":false,"feature_enabled":true},"impressionData":false},{"name":"editor-version-history-v2","enabled":true,"variant":{"name":"disabled","enabled":false,"feature_enabled":true},"impressionData":false},{"name":"billing-page-v2","enabled":true,"variant":{"name":"disabled","enabled":false,"feature_enabled":true},"impressionData":false},{"name":"full-page-search","enabled":true,"variant":{"name":"disabled","enabled":false,"feature_enabled":true},"impressionData":false},{"name":"workspace-projects","enabled":true,"variant":{"name":"disabled","enabled":false,"feature_enabled":true},"impressionData":false},{"name":"assistant-v5","enabled":true,"variant":{"name":"disabled","enabled":false,"feature_enabled":true},"impressionData":false},{"name":"fork-pr-previews","enabled":true,"variant":{"name":"disabled","enabled":false,"feature_enabled":true},"impressionData":false},{"name":"revalidation-jwt","enabled":true,"variant":{"name":"disabled","enabled":false,"feature_enabled":true},"impressionData":false},{"name":"workos-sso-scim","enabled":true,"variant":{"name":"disabled","enabled":false,"feature_enabled":true},"impressionData":false},{"name":"hobby-abuse-scan","enabled":true,"variant":{"name":"disabled","enabled":false,"feature_enabled":true},"impressionData":false},{"name":"dashboard-inbox","enabled":true,"variant":{"name":"disabled","enabled":false,"feature_enabled":true},"impressionData":false},{"name":"workos-signup","enabled":true,"variant":{"name":"disabled","enabled":false,"feature_enabled":true},"impressionData":false},{"name":"turbopuffer-dual-write","enabled":true,"variant":{"name":"disabled","enabled":false,"feature_enabled":true},"impressionData":false},{"name":"workos-enabled","enabled":true,"variant":{"name":"disabled","enabled":false,"feature_enabled":true},"impressionData":false},{"name":"approve-review-flow","enabled":true,"variant":{"name":"disabled","enabled":false,"feature_enabled":true},"impressionData":false},{"name":"editor-metadata","enabled":true,"variant":{"name":"disabled","enabled":false,"feature_enabled":true},"impressionData":false},{"name":"sso-setup-deadline-banner","enabled":true,"variant":{"name":"disabled","enabled":false,"feature_enabled":true},"impressionData":false},{"name":"turbopuffer-serve","enabled":true,"variant":{"name":"disabled","enabled":false,"feature_enabled":true},"impressionData":false},{"name":"live-agents","enabled":true,"variant":{"name":"disabled","enabled":false,"feature_enabled":true},"impressionData":false},{"name":"llms-txt-v2","enabled":true,"variant":{"name":"disabled","enabled":false,"feature_enabled":true},"impressionData":false}],"googleFontsInlined":false},"customCss":[{"filePath":"style.css","content":".payment-service-definition{background-color:white!important;border:1px solid #0a0e0d1a;border-radius:16px;padding:2em;vertical-align:middle}.payment-service-definition img{margin:0 1em 0 0;max-width:3em;display:inline-block}.payment-service-definition h2{margin:0;display:inline-block;position:relative;top:0.1em}#sidebar-title{text-transform:uppercase}#sidebar-group .group{flex-direction:row-reverse}#footer .max-w-36{max-width:40rem}"}],"page":{"pagePath":"guides/features/payment-links/overview","slug":"/guides/features/payment-links/overview","pageMetadata":{"title":"Payment links","sidebarTitle":"Overview","description":"Set up payment links to accept payments from your customers.","href":"/guides/features/payment-links/overview"},"description":{"compiledSource":"\"use strict\";\nconst {jsx: _jsx} = arguments[0];\nconst {useMDXComponents: _provideComponents} = arguments[0];\nfunction _createMdxContent(props) {\n const _components = {\n p: \"p\",\n ..._provideComponents(),\n ...props.components\n };\n return _jsx(_components.p, {\n children: \"Set up payment links to accept payments from your customers.\"\n });\n}\nfunction MDXContent(props = {}) {\n const {wrapper: MDXLayout} = {\n ..._provideComponents(),\n ...props.components\n };\n return MDXLayout ? _jsx(MDXLayout, {\n ...props,\n children: _jsx(_createMdxContent, {\n ...props\n })\n }) : _createMdxContent(props);\n}\nreturn {\n default: MDXContent\n};\n","frontmatter":{},"scope":{}},"pageType":"default","mdx":{"mdxSource":{"compiledSource":"\"use strict\";const{Fragment:_Fragment,jsx:_jsx,jsxs:_jsxs}=arguments[0];const{useMDXComponents:_provideComponents}=arguments[0];function _createMdxContent(props){const _components={a:`a`,code:`code`,li:`li`,p:`p`,pre:`pre`,span:`span`,strong:`strong`,ul:`ul`,..._provideComponents(),...props.components},{CodeBlock,CodeGroup,Heading,OptimizedImage,Warning}=_components;if(!CodeBlock)_missingMdxReference(`CodeBlock`,true);if(!CodeGroup)_missingMdxReference(`CodeGroup`,true);if(!Heading)_missingMdxReference(`Heading`,true);if(!OptimizedImage)_missingMdxReference(`OptimizedImage`,true);if(!Warning)_missingMdxReference(`Warning`,true);return _jsxs(_Fragment,{children:[_jsx(OptimizedImage,{src:`https://mintcdn.com/anglpay/xCeAKjR1rioilTOg/assets/images/payment-links/hero.png?fit=max\u0026auto=format\u0026n=xCeAKjR1rioilTOg\u0026q=85\u0026s=af760f66e3d02cb8cc02206692b0ac58`,alt:`Payment Links`,\"data-og-width\":`2560`,width:`2560`,\"data-og-height\":`1618`,height:`1618`,\"data-path\":`assets/images/payment-links/hero.png`,\"data-optimize\":`true`,\"data-opv\":`3`,srcset:`https://mintcdn.com/anglpay/xCeAKjR1rioilTOg/assets/images/payment-links/hero.png?w=280\u0026fit=max\u0026auto=format\u0026n=xCeAKjR1rioilTOg\u0026q=85\u0026s=5b3866e11712ec2d298ed3e3df1a78ef 280w, https://mintcdn.com/anglpay/xCeAKjR1rioilTOg/assets/images/payment-links/hero.png?w=560\u0026fit=max\u0026auto=format\u0026n=xCeAKjR1rioilTOg\u0026q=85\u0026s=fe12b4c70735a98a531d9d23b2eec48e 560w, https://mintcdn.com/anglpay/xCeAKjR1rioilTOg/assets/images/payment-links/hero.png?w=840\u0026fit=max\u0026auto=format\u0026n=xCeAKjR1rioilTOg\u0026q=85\u0026s=b3de29e29420bc3a6c5af8af59120a71 840w, https://mintcdn.com/anglpay/xCeAKjR1rioilTOg/assets/images/payment-links/hero.png?w=1100\u0026fit=max\u0026auto=format\u0026n=xCeAKjR1rioilTOg\u0026q=85\u0026s=9f0ee61f73924b8443b5352141c29148 1100w, https://mintcdn.com/anglpay/xCeAKjR1rioilTOg/assets/images/payment-links/hero.png?w=1650\u0026fit=max\u0026auto=format\u0026n=xCeAKjR1rioilTOg\u0026q=85\u0026s=d034e53bb8662b03abc1dec8ad6ae9de 1650w, https://mintcdn.com/anglpay/xCeAKjR1rioilTOg/assets/images/payment-links/hero.png?w=2500\u0026fit=max\u0026auto=format\u0026n=xCeAKjR1rioilTOg\u0026q=85\u0026s=dcfef3ba943154d6cd1d5d7632b437d9 2500w`}),`\n`,_jsx(_components.p,{children:`Payment links allows generation of a link, to send to a customer via email/sms/etc,\nand then have the customer pay without the need to host a custom checkout.`}),`\n`,_jsx(Heading,{level:`2`,id:`creating-a-payment-link`,children:`Creating a payment link`}),`\n`,_jsxs(_components.p,{children:[`Use the payment links endpoint to create a payment link with the data displayed on the hosted page. The `,_jsx(_components.a,{href:`/reference/payment-links/new-payment-link`,children:`payment links API endpoint`}),` makes it\neasy to get create a new payment link.`]}),`\n`,_jsx(CodeGroup,{children:_jsx(CodeBlock,{filename:`Request`,numberOfLines:`24`,language:`json`,children:_jsx(_components.pre,{className:`shiki shiki-themes github-light-default dark-plus`,style:{backgroundColor:`#ffffff`,\"--shiki-dark-bg\":`#0B0C0E`,color:`#1f2328`,\"--shiki-dark\":`#D4D4D4`},language:`json`,children:_jsxs(_components.code,{language:`json`,numberOfLines:`24`,children:[_jsx(_components.span,{className:`line`,children:_jsx(_components.span,{style:{color:`#1F2328`,\"--shiki-dark\":`#D4D4D4`},children:`{`})}),`\n`,_jsxs(_components.span,{className:`line`,children:[_jsx(_components.span,{style:{color:`#116329`,\"--shiki-dark\":`#9CDCFE`},children:` \"currency\"`}),_jsx(_components.span,{style:{color:`#1F2328`,\"--shiki-dark\":`#D4D4D4`},children:`:`}),_jsx(_components.span,{style:{color:`#0A3069`,\"--shiki-dark\":`#CE9178`},children:`\"AUD\"`}),_jsx(_components.span,{style:{color:`#1F2328`,\"--shiki-dark\":`#D4D4D4`},children:`,`})]}),`\n`,_jsxs(_components.span,{className:`line`,children:[_jsx(_components.span,{style:{color:`#116329`,\"--shiki-dark\":`#9CDCFE`},children:` \"country\"`}),_jsx(_components.span,{style:{color:`#1F2328`,\"--shiki-dark\":`#D4D4D4`},children:`:`}),_jsx(_components.span,{style:{color:`#0A3069`,\"--shiki-dark\":`#CE9178`},children:`\"AU\"`}),_jsx(_components.span,{style:{color:`#1F2328`,\"--shiki-dark\":`#D4D4D4`},children:`,`})]}),`\n`,_jsxs(_components.span,{className:`line`,children:[_jsx(_components.span,{style:{color:`#116329`,\"--shiki-dark\":`#9CDCFE`},children:` \"amount\"`}),_jsx(_components.span,{style:{color:`#1F2328`,\"--shiki-dark\":`#D4D4D4`},children:`:`}),_jsx(_components.span,{style:{color:`#0550AE`,\"--shiki-dark\":`#B5CEA8`},children:`1000`}),_jsx(_components.span,{style:{color:`#1F2328`,\"--shiki-dark\":`#D4D4D4`},children:`,`})]}),`\n`,_jsxs(_components.span,{className:`line`,children:[_jsx(_components.span,{style:{color:`#116329`,\"--shiki-dark\":`#9CDCFE`},children:` \"metadata\"`}),_jsx(_components.span,{style:{color:`#1F2328`,\"--shiki-dark\":`#D4D4D4`},children:`:{`})]}),`\n`,_jsxs(_components.span,{className:`line`,children:[_jsx(_components.span,{style:{color:`#116329`,\"--shiki-dark\":`#9CDCFE`},children:` \"TypeOfPayment\"`}),_jsx(_components.span,{style:{color:`#1F2328`,\"--shiki-dark\":`#D4D4D4`},children:`:`}),_jsx(_components.span,{style:{color:`#0A3069`,\"--shiki-dark\":`#CE9178`},children:`\"purchase\"`}),_jsx(_components.span,{style:{color:`#1F2328`,\"--shiki-dark\":`#D4D4D4`},children:`,`})]}),`\n`,_jsxs(_components.span,{className:`line`,children:[_jsx(_components.span,{style:{color:`#116329`,\"--shiki-dark\":`#9CDCFE`},children:` \"Carbon_FootPrint\"`}),_jsx(_components.span,{style:{color:`#1F2328`,\"--shiki-dark\":`#D4D4D4`},children:`:`}),_jsx(_components.span,{style:{color:`#0A3069`,\"--shiki-dark\":`#CE9178`},children:`\"10\"`})]}),`\n`,_jsx(_components.span,{className:`line`,children:_jsx(_components.span,{style:{color:`#1F2328`,\"--shiki-dark\":`#D4D4D4`},children:` },`})}),`\n`,_jsxs(_components.span,{className:`line`,children:[_jsx(_components.span,{style:{color:`#116329`,\"--shiki-dark\":`#9CDCFE`},children:` \"cart_items\"`}),_jsx(_components.span,{style:{color:`#1F2328`,\"--shiki-dark\":`#D4D4D4`},children:`:[`})]}),`\n`,_jsx(_components.span,{className:`line`,children:_jsx(_components.span,{style:{color:`#1F2328`,\"--shiki-dark\":`#D4D4D4`},children:` {`})}),`\n`,_jsxs(_components.span,{className:`line`,children:[_jsx(_components.span,{style:{color:`#116329`,\"--shiki-dark\":`#9CDCFE`},children:` \"name\"`}),_jsx(_components.span,{style:{color:`#1F2328`,\"--shiki-dark\":`#D4D4D4`},children:`:`}),_jsx(_components.span,{style:{color:`#0A3069`,\"--shiki-dark\":`#CE9178`},children:`\"Aloe\"`}),_jsx(_components.span,{style:{color:`#1F2328`,\"--shiki-dark\":`#D4D4D4`},children:`,`})]}),`\n`,_jsxs(_components.span,{className:`line`,children:[_jsx(_components.span,{style:{color:`#116329`,\"--shiki-dark\":`#9CDCFE`},children:` \"unit_amount\"`}),_jsx(_components.span,{style:{color:`#1F2328`,\"--shiki-dark\":`#D4D4D4`},children:`:`}),_jsx(_components.span,{style:{color:`#0550AE`,\"--shiki-dark\":`#B5CEA8`},children:`1000`}),_jsx(_components.span,{style:{color:`#1F2328`,\"--shiki-dark\":`#D4D4D4`},children:`,`})]}),`\n`,_jsxs(_components.span,{className:`line`,children:[_jsx(_components.span,{style:{color:`#116329`,\"--shiki-dark\":`#9CDCFE`},children:` \"quantity\"`}),_jsx(_components.span,{style:{color:`#1F2328`,\"--shiki-dark\":`#D4D4D4`},children:`:`}),_jsx(_components.span,{style:{color:`#0550AE`,\"--shiki-dark\":`#B5CEA8`},children:`1`}),_jsx(_components.span,{style:{color:`#1F2328`,\"--shiki-dark\":`#D4D4D4`},children:`,`})]}),`\n`,_jsxs(_components.span,{className:`line`,children:[_jsx(_components.span,{style:{color:`#116329`,\"--shiki-dark\":`#9CDCFE`},children:` \"sku\"`}),_jsx(_components.span,{style:{color:`#1F2328`,\"--shiki-dark\":`#D4D4D4`},children:`:`}),_jsx(_components.span,{style:{color:`#0A3069`,\"--shiki-dark\":`#CE9178`},children:`\"aloe\"`})]}),`\n`,_jsx(_components.span,{className:`line`,children:_jsx(_components.span,{style:{color:`#1F2328`,\"--shiki-dark\":`#D4D4D4`},children:` }`})}),`\n`,_jsx(_components.span,{className:`line`,children:_jsx(_components.span,{style:{color:`#1F2328`,\"--shiki-dark\":`#D4D4D4`},children:` ],`})}),`\n`,_jsxs(_components.span,{className:`line`,children:[_jsx(_components.span,{style:{color:`#116329`,\"--shiki-dark\":`#9CDCFE`},children:` \"merchant_banner_url\"`}),_jsx(_components.span,{style:{color:`#1F2328`,\"--shiki-dark\":`#D4D4D4`},children:`:`}),_jsx(_components.span,{style:{color:`#0A3069`,\"--shiki-dark\":`#CE9178`},children:`\"https://susies.store/logo.svg\"`}),_jsx(_components.span,{style:{color:`#1F2328`,\"--shiki-dark\":`#D4D4D4`},children:`,`})]}),`\n`,_jsxs(_components.span,{className:`line`,children:[_jsx(_components.span,{style:{color:`#116329`,\"--shiki-dark\":`#9CDCFE`},children:` \"merchant_color\"`}),_jsx(_components.span,{style:{color:`#1F2328`,\"--shiki-dark\":`#D4D4D4`},children:`:`}),_jsx(_components.span,{style:{color:`#0A3069`,\"--shiki-dark\":`#CE9178`},children:`\"#cf6b6b\"`}),_jsx(_components.span,{style:{color:`#1F2328`,\"--shiki-dark\":`#D4D4D4`},children:`,`})]}),`\n`,_jsxs(_components.span,{className:`line`,children:[_jsx(_components.span,{style:{color:`#116329`,\"--shiki-dark\":`#9CDCFE`},children:` \"merchant_name\"`}),_jsx(_components.span,{style:{color:`#1F2328`,\"--shiki-dark\":`#D4D4D4`},children:`:`}),_jsx(_components.span,{style:{color:`#0A3069`,\"--shiki-dark\":`#CE9178`},children:`\"Susie's Store\"`}),_jsx(_components.span,{style:{color:`#1F2328`,\"--shiki-dark\":`#D4D4D4`},children:`,`})]}),`\n`,_jsxs(_components.span,{className:`line`,children:[_jsx(_components.span,{style:{color:`#116329`,\"--shiki-dark\":`#9CDCFE`},children:` \"merchant_url\"`}),_jsx(_components.span,{style:{color:`#1F2328`,\"--shiki-dark\":`#D4D4D4`},children:`:`}),_jsx(_components.span,{style:{color:`#0A3069`,\"--shiki-dark\":`#CE9178`},children:`\"https://susies.store\"`}),_jsx(_components.span,{style:{color:`#1F2328`,\"--shiki-dark\":`#D4D4D4`},children:`,`})]}),`\n`,_jsxs(_components.span,{className:`line`,children:[_jsx(_components.span,{style:{color:`#116329`,\"--shiki-dark\":`#9CDCFE`},children:` \"merchant_message\"`}),_jsx(_components.span,{style:{color:`#1F2328`,\"--shiki-dark\":`#D4D4D4`},children:`:`}),_jsx(_components.span,{style:{color:`#0A3069`,\"--shiki-dark\":`#CE9178`},children:`\"Thanks for your purchase at Susie's Store!\"`}),_jsx(_components.span,{style:{color:`#1F2328`,\"--shiki-dark\":`#D4D4D4`},children:`,`})]}),`\n`,_jsxs(_components.span,{className:`line`,children:[_jsx(_components.span,{style:{color:`#116329`,\"--shiki-dark\":`#9CDCFE`},children:` \"merchant_terms_and_conditions_url\"`}),_jsx(_components.span,{style:{color:`#1F2328`,\"--shiki-dark\":`#D4D4D4`},children:`:`}),_jsx(_components.span,{style:{color:`#0A3069`,\"--shiki-dark\":`#CE9178`},children:`\"https://susies.store/terms-and-conditions\"`}),_jsx(_components.span,{style:{color:`#1F2328`,\"--shiki-dark\":`#D4D4D4`},children:`,`})]}),`\n`,_jsxs(_components.span,{className:`line`,children:[_jsx(_components.span,{style:{color:`#116329`,\"--shiki-dark\":`#9CDCFE`},children:` \"return_url\"`}),_jsx(_components.span,{style:{color:`#1F2328`,\"--shiki-dark\":`#D4D4D4`},children:`:`}),_jsx(_components.span,{style:{color:`#0A3069`,\"--shiki-dark\":`#CE9178`},children:`\"https://susies.store/success\"`})]}),`\n`,_jsx(_components.span,{className:`line`,children:_jsx(_components.span,{style:{color:`#1F2328`,\"--shiki-dark\":`#D4D4D4`},children:`}`})}),`\n`]})})})}),`\n`,_jsxs(_components.p,{children:[`The payment link includes the `,_jsx(_components.code,{children:`expires_at`}),`, `,_jsx(_components.code,{children:`status`}),`, and other useful information\nused by the hosted page. Make note of the returned `,_jsx(_components.code,{children:`id`}),` as it is used in the next step.`]}),`\n`,_jsx(CodeGroup,{children:_jsx(CodeBlock,{filename:`Response`,numberOfLines:`10`,language:`json`,children:_jsx(_components.pre,{className:`shiki shiki-themes github-light-default dark-plus`,style:{backgroundColor:`#ffffff`,\"--shiki-dark-bg\":`#0B0C0E`,color:`#1f2328`,\"--shiki-dark\":`#D4D4D4`},language:`json`,children:_jsxs(_components.code,{language:`json`,numberOfLines:`10`,children:[_jsx(_components.span,{className:`line`,children:_jsx(_components.span,{style:{color:`#1F2328`,\"--shiki-dark\":`#D4D4D4`},children:`{`})}),`\n`,_jsxs(_components.span,{className:`line`,children:[_jsx(_components.span,{style:{color:`#116329`,\"--shiki-dark\":`#9CDCFE`},children:` \"id\"`}),_jsx(_components.span,{style:{color:`#1F2328`,\"--shiki-dark\":`#D4D4D4`},children:`: `}),_jsx(_components.span,{style:{color:`#0A3069`,\"--shiki-dark\":`#CE9178`},children:`\"09e90ace-a746-41f5-88d2-8b16335ded97\"`}),_jsx(_components.span,{style:{color:`#1F2328`,\"--shiki-dark\":`#D4D4D4`},children:`,`})]}),`\n`,_jsxs(_components.span,{className:`line`,children:[_jsx(_components.span,{style:{color:`#116329`,\"--shiki-dark\":`#9CDCFE`},children:` \"type\"`}),_jsx(_components.span,{style:{color:`#1F2328`,\"--shiki-dark\":`#D4D4D4`},children:`: `}),_jsx(_components.span,{style:{color:`#0A3069`,\"--shiki-dark\":`#CE9178`},children:`\"payment-link\"`}),_jsx(_components.span,{style:{color:`#1F2328`,\"--shiki-dark\":`#D4D4D4`},children:`,`})]}),`\n`,_jsxs(_components.span,{className:`line`,children:[_jsx(_components.span,{style:{color:`#116329`,\"--shiki-dark\":`#9CDCFE`},children:` \"expires_at\"`}),_jsx(_components.span,{style:{color:`#1F2328`,\"--shiki-dark\":`#D4D4D4`},children:`: `}),_jsx(_components.span,{style:{color:`#0A3069`,\"--shiki-dark\":`#CE9178`},children:`\"2025-01-28T14:45:45.929102+00:00\"`}),_jsx(_components.span,{style:{color:`#1F2328`,\"--shiki-dark\":`#D4D4D4`},children:`,`})]}),`\n`,_jsxs(_components.span,{className:`line`,children:[_jsx(_components.span,{style:{color:`#116329`,\"--shiki-dark\":`#9CDCFE`},children:` \"amount\"`}),_jsx(_components.span,{style:{color:`#1F2328`,\"--shiki-dark\":`#D4D4D4`},children:`: `}),_jsx(_components.span,{style:{color:`#0550AE`,\"--shiki-dark\":`#B5CEA8`},children:`1000`}),_jsx(_components.span,{style:{color:`#1F2328`,\"--shiki-dark\":`#D4D4D4`},children:`,`})]}),`\n`,_jsxs(_components.span,{className:`line`,children:[_jsx(_components.span,{style:{color:`#116329`,\"--shiki-dark\":`#9CDCFE`},children:` \"currency\"`}),_jsx(_components.span,{style:{color:`#1F2328`,\"--shiki-dark\":`#D4D4D4`},children:`: `}),_jsx(_components.span,{style:{color:`#0A3069`,\"--shiki-dark\":`#CE9178`},children:`\"AUD\"`}),_jsx(_components.span,{style:{color:`#1F2328`,\"--shiki-dark\":`#D4D4D4`},children:`,`})]}),`\n`,_jsxs(_components.span,{className:`line`,children:[_jsx(_components.span,{style:{color:`#116329`,\"--shiki-dark\":`#9CDCFE`},children:` \"country\"`}),_jsx(_components.span,{style:{color:`#1F2328`,\"--shiki-dark\":`#D4D4D4`},children:`: `}),_jsx(_components.span,{style:{color:`#0A3069`,\"--shiki-dark\":`#CE9178`},children:`\"AU\"`}),_jsx(_components.span,{style:{color:`#1F2328`,\"--shiki-dark\":`#D4D4D4`},children:`,`})]}),`\n`,_jsxs(_components.span,{className:`line`,children:[_jsx(_components.span,{style:{color:`#116329`,\"--shiki-dark\":`#9CDCFE`},children:` \"status\"`}),_jsx(_components.span,{style:{color:`#1F2328`,\"--shiki-dark\":`#D4D4D4`},children:`: `}),_jsx(_components.span,{style:{color:`#0A3069`,\"--shiki-dark\":`#CE9178`},children:`\"active\"`}),_jsx(_components.span,{style:{color:`#1F2328`,\"--shiki-dark\":`#D4D4D4`},children:`,`})]}),`\n`,_jsx(_components.span,{className:`line`,children:_jsx(_components.span,{style:{color:`#82071E`,\"--shiki-light-font-style\":`italic`,\"--shiki-dark\":`#F44747`,\"--shiki-dark-font-style\":`inherit`},children:` ...`})}),`\n`,_jsx(_components.span,{className:`line`,children:_jsx(_components.span,{style:{color:`#1F2328`,\"--shiki-dark\":`#D4D4D4`},children:`}`})}),`\n`]})})})}),`\n`,_jsxs(_components.p,{children:[`The hosted page passes these fields to `,_jsx(_components.a,{href:`/guides/payments/embed/options#options`,children:`Embed`}),`, which uses them to create the transaction:`]}),`\n`,_jsxs(_components.ul,{children:[`\n`,_jsxs(_components.li,{children:[_jsx(_components.code,{children:`amount`}),`, `,_jsx(_components.code,{children:`currency`}),`, and `,_jsx(_components.code,{children:`country`}),` (required)`]}),`\n`,_jsx(_components.li,{children:_jsx(_components.code,{children:`buyer`})}),`\n`,_jsx(_components.li,{children:_jsx(_components.code,{children:`buyer_id`})}),`\n`,_jsx(_components.li,{children:_jsx(_components.code,{children:`cart_items`})}),`\n`,_jsx(_components.li,{children:_jsx(_components.code,{children:`connection_options`})}),`\n`,_jsx(_components.li,{children:_jsx(_components.code,{children:`external_identifier`})}),`\n`,_jsx(_components.li,{children:_jsx(_components.code,{children:`installment_count`})}),`\n`,_jsx(_components.li,{children:_jsx(_components.code,{children:`intent`})}),`\n`,_jsx(_components.li,{children:_jsx(_components.code,{children:`metadata`})}),`\n`,_jsx(_components.li,{children:_jsx(_components.code,{children:`payment_source`})}),`\n`,_jsx(_components.li,{children:_jsx(_components.code,{children:`statement_descriptor`})}),`\n`,_jsx(_components.li,{children:_jsx(_components.code,{children:`store`})}),`\n`]}),`\n`,_jsx(_components.p,{children:`These fields control the hosted page itself:`}),`\n`,_jsxs(_components.ul,{children:[`\n`,_jsxs(_components.li,{children:[_jsx(_components.code,{children:`expires_at`}),` sets when the link expires. See `,_jsx(_components.a,{href:`/guides/features/payment-links/statuses#expiration`,children:`expiration`}),`.`]}),`\n`,_jsxs(_components.li,{children:[_jsx(_components.code,{children:`locale`}),` sets the language of the page.`]}),`\n`,_jsxs(_components.li,{children:[_jsx(_components.code,{children:`return_url`}),` is where the page sends the customer once the transaction is created, whatever its outcome. Gr4vy appends `,_jsx(_components.code,{children:`gr4vy_transaction_id`}),` and `,_jsx(_components.code,{children:`gr4vy_transaction_status`}),`. Without it, the page shows its own confirmation screen.`]}),`\n`,_jsxs(_components.li,{children:[_jsx(_components.code,{children:`merchant_name`}),`, `,_jsx(_components.code,{children:`merchant_url`}),`, `,_jsx(_components.code,{children:`merchant_banner_url`}),`, `,_jsx(_components.code,{children:`merchant_color`}),`, `,_jsx(_components.code,{children:`merchant_message`}),`, `,_jsx(_components.code,{children:`merchant_terms_and_conditions_url`}),`, and `,_jsx(_components.code,{children:`merchant_favicon_url`}),` brand the page. When you set both `,_jsx(_components.code,{children:`merchant_name`}),` and `,_jsx(_components.code,{children:`merchant_url`}),`, the success and expired screens show a `,_jsx(_components.strong,{children:`Return to`}),` link with your merchant name that opens `,_jsx(_components.code,{children:`merchant_url`}),`.`]}),`\n`]}),`\n`,_jsxs(_components.p,{children:[`See the `,_jsx(_components.a,{href:`/reference/payment-links/new-payment-link`,children:`API reference`}),` for the full list of fields.`]}),`\n`,_jsx(_components.p,{children:`By creating a payment link, send it to the customer to complete the payment.`}),`\n`,_jsx(Heading,{level:`2`,id:`set-the-intent`,children:`Set the intent`}),`\n`,_jsxs(_components.p,{children:[_jsx(_components.code,{children:`intent`}),` sets the initial state of the transaction that the payment link creates. It accepts `,_jsx(_components.code,{children:`authorize`}),`, which is the default, `,_jsx(_components.code,{children:`capture`}),`, or `,_jsx(_components.code,{children:`prefer_authorize`}),`.`]}),`\n`,_jsxs(_components.p,{children:[_jsx(_components.code,{children:`prefer_authorize`}),` authorizes the payment where the payment service supports delayed capture, and captures it where it doesn’t. It’s the payment link equivalent of the Embed `,_jsx(_components.a,{href:`/guides/payments/embed/options#options`,children:_jsx(_components.code,{children:`preferAuthorize`})}),` option. The spelling differs on purpose: the API uses snake_case, so the payment link value is `,_jsx(_components.code,{children:`prefer_authorize`}),`.`]}),`\n`,_jsx(_components.p,{children:`A payment link’s intent and its transaction’s intent are different things:`}),`\n`,_jsxs(_components.ul,{children:[`\n`,_jsxs(_components.li,{children:[`A transaction created from a `,_jsx(_components.code,{children:`prefer_authorize`}),` link always reports its `,_jsx(_components.code,{children:`intent`}),` as `,_jsx(_components.code,{children:`authorize`}),` or `,_jsx(_components.code,{children:`capture`}),`, never `,_jsx(_components.code,{children:`prefer_authorize`}),`.`]}),`\n`,_jsxs(_components.li,{children:[`The payment link keeps the intent it was created with, so the `,_jsxs(_components.a,{href:`/guides/features/webhooks/events`,children:[_jsx(_components.code,{children:`payment-link.created`}),` and `,_jsx(_components.code,{children:`payment-link.updated`}),` webhooks`]}),` can carry `,_jsx(_components.code,{children:`\"intent\": \"prefer_authorize\"`}),`.`]}),`\n`]}),`\n`,_jsx(Heading,{level:`2`,id:`add-airline-data`,children:`Add airline data`}),`\n`,_jsxs(_components.p,{children:[`To send airline travel data to the payment service, set the `,_jsx(_components.code,{children:`airline`}),` object when you create the payment link. It uses the same schema as `,_jsx(_components.code,{children:`airline`}),` on `,_jsx(_components.a,{href:`/reference/transactions/new-transaction`,children:`create transaction`}),`, so it can describe several passengers and several flight legs.`]}),`\n`,_jsx(CodeBlock,{filename:``,numberOfLines:`1`,language:`http`,children:_jsx(_components.pre,{className:`shiki shiki-themes github-light-default dark-plus`,style:{backgroundColor:`#ffffff`,\"--shiki-dark-bg\":`#0B0C0E`,color:`#1f2328`,\"--shiki-dark\":`#D4D4D4`},language:`http`,children:_jsxs(_components.code,{language:`http`,numberOfLines:`1`,children:[_jsxs(_components.span,{className:`line`,children:[_jsx(_components.span,{style:{color:`#CF222E`,\"--shiki-dark\":`#C586C0`},children:`POST`}),_jsx(_components.span,{style:{color:`#1F2328`,\"--shiki-dark\":`#D4D4D4`},children:` /payment-links`})]}),`\n`]})})}),`\n`,_jsx(CodeBlock,{filename:``,numberOfLines:`20`,language:`json`,children:_jsx(_components.pre,{className:`shiki shiki-themes github-light-default dark-plus`,style:{backgroundColor:`#ffffff`,\"--shiki-dark-bg\":`#0B0C0E`,color:`#1f2328`,\"--shiki-dark\":`#D4D4D4`},language:`json`,children:_jsxs(_components.code,{language:`json`,numberOfLines:`20`,children:[_jsx(_components.span,{className:`line`,children:_jsx(_components.span,{style:{color:`#1F2328`,\"--shiki-dark\":`#D4D4D4`},children:`{`})}),`\n`,_jsxs(_components.span,{className:`line`,children:[_jsx(_components.span,{style:{color:`#116329`,\"--shiki-dark\":`#9CDCFE`},children:` \"amount\"`}),_jsx(_components.span,{style:{color:`#1F2328`,\"--shiki-dark\":`#D4D4D4`},children:`: `}),_jsx(_components.span,{style:{color:`#0550AE`,\"--shiki-dark\":`#B5CEA8`},children:`84000`}),_jsx(_components.span,{style:{color:`#1F2328`,\"--shiki-dark\":`#D4D4D4`},children:`,`})]}),`\n`,_jsxs(_components.span,{className:`line`,children:[_jsx(_components.span,{style:{color:`#116329`,\"--shiki-dark\":`#9CDCFE`},children:` \"currency\"`}),_jsx(_components.span,{style:{color:`#1F2328`,\"--shiki-dark\":`#D4D4D4`},children:`: `}),_jsx(_components.span,{style:{color:`#0A3069`,\"--shiki-dark\":`#CE9178`},children:`\"USD\"`}),_jsx(_components.span,{style:{color:`#1F2328`,\"--shiki-dark\":`#D4D4D4`},children:`,`})]}),`\n`,_jsxs(_components.span,{className:`line`,children:[_jsx(_components.span,{style:{color:`#116329`,\"--shiki-dark\":`#9CDCFE`},children:` \"country\"`}),_jsx(_components.span,{style:{color:`#1F2328`,\"--shiki-dark\":`#D4D4D4`},children:`: `}),_jsx(_components.span,{style:{color:`#0A3069`,\"--shiki-dark\":`#CE9178`},children:`\"US\"`}),_jsx(_components.span,{style:{color:`#1F2328`,\"--shiki-dark\":`#D4D4D4`},children:`,`})]}),`\n`,_jsxs(_components.span,{className:`line`,children:[_jsx(_components.span,{style:{color:`#116329`,\"--shiki-dark\":`#9CDCFE`},children:` \"intent\"`}),_jsx(_components.span,{style:{color:`#1F2328`,\"--shiki-dark\":`#D4D4D4`},children:`: `}),_jsx(_components.span,{style:{color:`#0A3069`,\"--shiki-dark\":`#CE9178`},children:`\"authorize\"`}),_jsx(_components.span,{style:{color:`#1F2328`,\"--shiki-dark\":`#D4D4D4`},children:`,`})]}),`\n`,_jsxs(_components.span,{className:`line`,children:[_jsx(_components.span,{style:{color:`#116329`,\"--shiki-dark\":`#9CDCFE`},children:` \"airline\"`}),_jsx(_components.span,{style:{color:`#1F2328`,\"--shiki-dark\":`#D4D4D4`},children:`: {`})]}),`\n`,_jsxs(_components.span,{className:`line`,children:[_jsx(_components.span,{style:{color:`#116329`,\"--shiki-dark\":`#9CDCFE`},children:` \"booking_code\"`}),_jsx(_components.span,{style:{color:`#1F2328`,\"--shiki-dark\":`#D4D4D4`},children:`: `}),_jsx(_components.span,{style:{color:`#0A3069`,\"--shiki-dark\":`#CE9178`},children:`\"X36Q9C\"`}),_jsx(_components.span,{style:{color:`#1F2328`,\"--shiki-dark\":`#D4D4D4`},children:`,`})]}),`\n`,_jsxs(_components.span,{className:`line`,children:[_jsx(_components.span,{style:{color:`#116329`,\"--shiki-dark\":`#9CDCFE`},children:` \"passenger_name_record\"`}),_jsx(_components.span,{style:{color:`#1F2328`,\"--shiki-dark\":`#D4D4D4`},children:`: `}),_jsx(_components.span,{style:{color:`#0A3069`,\"--shiki-dark\":`#CE9178`},children:`\"LUHN/JOHN\"`}),_jsx(_components.span,{style:{color:`#1F2328`,\"--shiki-dark\":`#D4D4D4`},children:`,`})]}),`\n`,_jsxs(_components.span,{className:`line`,children:[_jsx(_components.span,{style:{color:`#116329`,\"--shiki-dark\":`#9CDCFE`},children:` \"ticket_number\"`}),_jsx(_components.span,{style:{color:`#1F2328`,\"--shiki-dark\":`#D4D4D4`},children:`: `}),_jsx(_components.span,{style:{color:`#0A3069`,\"--shiki-dark\":`#CE9178`},children:`\"123-1234151555\"`}),_jsx(_components.span,{style:{color:`#1F2328`,\"--shiki-dark\":`#D4D4D4`},children:`,`})]}),`\n`,_jsxs(_components.span,{className:`line`,children:[_jsx(_components.span,{style:{color:`#116329`,\"--shiki-dark\":`#9CDCFE`},children:` \"issuing_iata_designator\"`}),_jsx(_components.span,{style:{color:`#1F2328`,\"--shiki-dark\":`#D4D4D4`},children:`: `}),_jsx(_components.span,{style:{color:`#0A3069`,\"--shiki-dark\":`#CE9178`},children:`\"XX\"`}),_jsx(_components.span,{style:{color:`#1F2328`,\"--shiki-dark\":`#D4D4D4`},children:`,`})]}),`\n`,_jsxs(_components.span,{className:`line`,children:[_jsx(_components.span,{style:{color:`#116329`,\"--shiki-dark\":`#9CDCFE`},children:` \"passengers\"`}),_jsx(_components.span,{style:{color:`#1F2328`,\"--shiki-dark\":`#D4D4D4`},children:`: [`})]}),`\n`,_jsxs(_components.span,{className:`line`,children:[_jsx(_components.span,{style:{color:`#1F2328`,\"--shiki-dark\":`#D4D4D4`},children:` { `}),_jsx(_components.span,{style:{color:`#116329`,\"--shiki-dark\":`#9CDCFE`},children:`\"first_name\"`}),_jsx(_components.span,{style:{color:`#1F2328`,\"--shiki-dark\":`#D4D4D4`},children:`: `}),_jsx(_components.span,{style:{color:`#0A3069`,\"--shiki-dark\":`#CE9178`},children:`\"John\"`}),_jsx(_components.span,{style:{color:`#1F2328`,\"--shiki-dark\":`#D4D4D4`},children:`, `}),_jsx(_components.span,{style:{color:`#116329`,\"--shiki-dark\":`#9CDCFE`},children:`\"last_name\"`}),_jsx(_components.span,{style:{color:`#1F2328`,\"--shiki-dark\":`#D4D4D4`},children:`: `}),_jsx(_components.span,{style:{color:`#0A3069`,\"--shiki-dark\":`#CE9178`},children:`\"Luhn\"`}),_jsx(_components.span,{style:{color:`#1F2328`,\"--shiki-dark\":`#D4D4D4`},children:`, `}),_jsx(_components.span,{style:{color:`#116329`,\"--shiki-dark\":`#9CDCFE`},children:`\"age_group\"`}),_jsx(_components.span,{style:{color:`#1F2328`,\"--shiki-dark\":`#D4D4D4`},children:`: `}),_jsx(_components.span,{style:{color:`#0A3069`,\"--shiki-dark\":`#CE9178`},children:`\"adult\"`}),_jsx(_components.span,{style:{color:`#1F2328`,\"--shiki-dark\":`#D4D4D4`},children:`, `}),_jsx(_components.span,{style:{color:`#116329`,\"--shiki-dark\":`#9CDCFE`},children:`\"ticket_number\"`}),_jsx(_components.span,{style:{color:`#1F2328`,\"--shiki-dark\":`#D4D4D4`},children:`: `}),_jsx(_components.span,{style:{color:`#0A3069`,\"--shiki-dark\":`#CE9178`},children:`\"123-1234151555\"`}),_jsx(_components.span,{style:{color:`#1F2328`,\"--shiki-dark\":`#D4D4D4`},children:` },`})]}),`\n`,_jsxs(_components.span,{className:`line`,children:[_jsx(_components.span,{style:{color:`#1F2328`,\"--shiki-dark\":`#D4D4D4`},children:` { `}),_jsx(_components.span,{style:{color:`#116329`,\"--shiki-dark\":`#9CDCFE`},children:`\"first_name\"`}),_jsx(_components.span,{style:{color:`#1F2328`,\"--shiki-dark\":`#D4D4D4`},children:`: `}),_jsx(_components.span,{style:{color:`#0A3069`,\"--shiki-dark\":`#CE9178`},children:`\"Jane\"`}),_jsx(_components.span,{style:{color:`#1F2328`,\"--shiki-dark\":`#D4D4D4`},children:`, `}),_jsx(_components.span,{style:{color:`#116329`,\"--shiki-dark\":`#9CDCFE`},children:`\"last_name\"`}),_jsx(_components.span,{style:{color:`#1F2328`,\"--shiki-dark\":`#D4D4D4`},children:`: `}),_jsx(_components.span,{style:{color:`#0A3069`,\"--shiki-dark\":`#CE9178`},children:`\"Luhn\"`}),_jsx(_components.span,{style:{color:`#1F2328`,\"--shiki-dark\":`#D4D4D4`},children:`, `}),_jsx(_components.span,{style:{color:`#116329`,\"--shiki-dark\":`#9CDCFE`},children:`\"age_group\"`}),_jsx(_components.span,{style:{color:`#1F2328`,\"--shiki-dark\":`#D4D4D4`},children:`: `}),_jsx(_components.span,{style:{color:`#0A3069`,\"--shiki-dark\":`#CE9178`},children:`\"adult\"`}),_jsx(_components.span,{style:{color:`#1F2328`,\"--shiki-dark\":`#D4D4D4`},children:`, `}),_jsx(_components.span,{style:{color:`#116329`,\"--shiki-dark\":`#9CDCFE`},children:`\"ticket_number\"`}),_jsx(_components.span,{style:{color:`#1F2328`,\"--shiki-dark\":`#D4D4D4`},children:`: `}),_jsx(_components.span,{style:{color:`#0A3069`,\"--shiki-dark\":`#CE9178`},children:`\"123-1234151556\"`}),_jsx(_components.span,{style:{color:`#1F2328`,\"--shiki-dark\":`#D4D4D4`},children:` }`})]}),`\n`,_jsx(_components.span,{className:`line`,children:_jsx(_components.span,{style:{color:`#1F2328`,\"--shiki-dark\":`#D4D4D4`},children:` ],`})}),`\n`,_jsxs(_components.span,{className:`line`,children:[_jsx(_components.span,{style:{color:`#116329`,\"--shiki-dark\":`#9CDCFE`},children:` \"legs\"`}),_jsx(_components.span,{style:{color:`#1F2328`,\"--shiki-dark\":`#D4D4D4`},children:`: [`})]}),`\n`,_jsxs(_components.span,{className:`line`,children:[_jsx(_components.span,{style:{color:`#1F2328`,\"--shiki-dark\":`#D4D4D4`},children:` { `}),_jsx(_components.span,{style:{color:`#116329`,\"--shiki-dark\":`#9CDCFE`},children:`\"iata_designator\"`}),_jsx(_components.span,{style:{color:`#1F2328`,\"--shiki-dark\":`#D4D4D4`},children:`: `}),_jsx(_components.span,{style:{color:`#0A3069`,\"--shiki-dark\":`#CE9178`},children:`\"XX\"`}),_jsx(_components.span,{style:{color:`#1F2328`,\"--shiki-dark\":`#D4D4D4`},children:`, `}),_jsx(_components.span,{style:{color:`#116329`,\"--shiki-dark\":`#9CDCFE`},children:`\"flight_number\"`}),_jsx(_components.span,{style:{color:`#1F2328`,\"--shiki-dark\":`#D4D4D4`},children:`: `}),_jsx(_components.span,{style:{color:`#0A3069`,\"--shiki-dark\":`#CE9178`},children:`\"101\"`}),_jsx(_components.span,{style:{color:`#1F2328`,\"--shiki-dark\":`#D4D4D4`},children:`, `}),_jsx(_components.span,{style:{color:`#116329`,\"--shiki-dark\":`#9CDCFE`},children:`\"departure_airport\"`}),_jsx(_components.span,{style:{color:`#1F2328`,\"--shiki-dark\":`#D4D4D4`},children:`: `}),_jsx(_components.span,{style:{color:`#0A3069`,\"--shiki-dark\":`#CE9178`},children:`\"JFK\"`}),_jsx(_components.span,{style:{color:`#1F2328`,\"--shiki-dark\":`#D4D4D4`},children:`, `}),_jsx(_components.span,{style:{color:`#116329`,\"--shiki-dark\":`#9CDCFE`},children:`\"arrival_airport\"`}),_jsx(_components.span,{style:{color:`#1F2328`,\"--shiki-dark\":`#D4D4D4`},children:`: `}),_jsx(_components.span,{style:{color:`#0A3069`,\"--shiki-dark\":`#CE9178`},children:`\"LHR\"`}),_jsx(_components.span,{style:{color:`#1F2328`,\"--shiki-dark\":`#D4D4D4`},children:`, `}),_jsx(_components.span,{style:{color:`#116329`,\"--shiki-dark\":`#9CDCFE`},children:`\"departure_at\"`}),_jsx(_components.span,{style:{color:`#1F2328`,\"--shiki-dark\":`#D4D4D4`},children:`: `}),_jsx(_components.span,{style:{color:`#0A3069`,\"--shiki-dark\":`#CE9178`},children:`\"2027-01-10T19:00:00+00:00\"`}),_jsx(_components.span,{style:{color:`#1F2328`,\"--shiki-dark\":`#D4D4D4`},children:` },`})]}),`\n`,_jsxs(_components.span,{className:`line`,children:[_jsx(_components.span,{style:{color:`#1F2328`,\"--shiki-dark\":`#D4D4D4`},children:` { `}),_jsx(_components.span,{style:{color:`#116329`,\"--shiki-dark\":`#9CDCFE`},children:`\"iata_designator\"`}),_jsx(_components.span,{style:{color:`#1F2328`,\"--shiki-dark\":`#D4D4D4`},children:`: `}),_jsx(_components.span,{style:{color:`#0A3069`,\"--shiki-dark\":`#CE9178`},children:`\"XX\"`}),_jsx(_components.span,{style:{color:`#1F2328`,\"--shiki-dark\":`#D4D4D4`},children:`, `}),_jsx(_components.span,{style:{color:`#116329`,\"--shiki-dark\":`#9CDCFE`},children:`\"flight_number\"`}),_jsx(_components.span,{style:{color:`#1F2328`,\"--shiki-dark\":`#D4D4D4`},children:`: `}),_jsx(_components.span,{style:{color:`#0A3069`,\"--shiki-dark\":`#CE9178`},children:`\"102\"`}),_jsx(_components.span,{style:{color:`#1F2328`,\"--shiki-dark\":`#D4D4D4`},children:`, `}),_jsx(_components.span,{style:{color:`#116329`,\"--shiki-dark\":`#9CDCFE`},children:`\"departure_airport\"`}),_jsx(_components.span,{style:{color:`#1F2328`,\"--shiki-dark\":`#D4D4D4`},children:`: `}),_jsx(_components.span,{style:{color:`#0A3069`,\"--shiki-dark\":`#CE9178`},children:`\"LHR\"`}),_jsx(_components.span,{style:{color:`#1F2328`,\"--shiki-dark\":`#D4D4D4`},children:`, `}),_jsx(_components.span,{style:{color:`#116329`,\"--shiki-dark\":`#9CDCFE`},children:`\"arrival_airport\"`}),_jsx(_components.span,{style:{color:`#1F2328`,\"--shiki-dark\":`#D4D4D4`},children:`: `}),_jsx(_components.span,{style:{color:`#0A3069`,\"--shiki-dark\":`#CE9178`},children:`\"JFK\"`}),_jsx(_components.span,{style:{color:`#1F2328`,\"--shiki-dark\":`#D4D4D4`},children:`, `}),_jsx(_components.span,{style:{color:`#116329`,\"--shiki-dark\":`#9CDCFE`},children:`\"departure_at\"`}),_jsx(_components.span,{style:{color:`#1F2328`,\"--shiki-dark\":`#D4D4D4`},children:`: `}),_jsx(_components.span,{style:{color:`#0A3069`,\"--shiki-dark\":`#CE9178`},children:`\"2027-01-24T11:00:00+00:00\"`}),_jsx(_components.span,{style:{color:`#1F2328`,\"--shiki-dark\":`#D4D4D4`},children:` }`})]}),`\n`,_jsx(_components.span,{className:`line`,children:_jsx(_components.span,{style:{color:`#1F2328`,\"--shiki-dark\":`#D4D4D4`},children:` ]`})}),`\n`,_jsx(_components.span,{className:`line`,children:_jsx(_components.span,{style:{color:`#1F2328`,\"--shiki-dark\":`#D4D4D4`},children:` }`})}),`\n`,_jsx(_components.span,{className:`line`,children:_jsx(_components.span,{style:{color:`#1F2328`,\"--shiki-dark\":`#D4D4D4`},children:`}`})}),`\n`]})})}),`\n`,_jsxs(_components.p,{children:[`When the customer pays the link, Gr4vy copies the airline data onto the transaction and sends it to the payment service at authorization, including after 3DS. If you capture later without an `,_jsx(_components.code,{children:`airline`}),` object, Gr4vy sends the stored airline data with the capture.`]}),`\n`,_jsxs(_components.ul,{children:[`\n`,_jsxs(_components.li,{children:[`The airline data on the payment link takes precedence over any `,_jsx(_components.code,{children:`airline`}),` object sent when the transaction is created.`]}),`\n`,_jsx(_components.li,{children:`You can’t change the airline data after you create the payment link.`}),`\n`,_jsxs(_components.li,{children:[_jsx(_components.a,{href:`/reference/payment-links/get-payment-link`,children:`Get payment link`}),` and `,_jsx(_components.a,{href:`/reference/payment-links/list-payment-links`,children:`list payment links`}),` return the `,_jsx(_components.code,{children:`airline`}),` object. The hosted page never receives or shows it, so the customer doesn’t see passenger details.`]}),`\n`,_jsxs(_components.li,{children:[`Connections that accept airline data, such as `,_jsx(_components.a,{href:`/connections/payments/nuvei-card`,children:`Nuvei`}),` and `,_jsx(_components.a,{href:`/connections/payments/travelhub-card`,children:`Worldline TravelHub`}),`, forward it to the payment service. Other connections ignore it.`]}),`\n`]}),`\n`,_jsx(Heading,{level:`2`,id:`limit-the-payment-methods-on-a-link`,children:`Limit the payment methods on a link`}),`\n`,_jsxs(_components.p,{children:[`Payment links don’t take a list of payment methods to show or hide. To control which methods\nappear, set a `,_jsx(_components.code,{children:`metadata`}),` key on the payment link, for example `,_jsx(_components.code,{children:`{\"link_type\": \"invoice\"}`}),`, and add a\nrule to the `,_jsx(_components.a,{href:`/guides/dashboard/flow/checkout#action-select-payment-options`,children:`Checkout Flow`}),` with a\n`,_jsx(_components.strong,{children:`Metadata`}),` condition on that key. The rule then selects the payment options for those links. If no\nrule matches, the page shows all configured and active payment options. Checkout Flow rules apply\nto the whole merchant account, not just to payment links.`]}),`\n`,_jsx(Heading,{level:`2`,id:`storing-a-payment-method`,children:`Storing a payment method`}),`\n`,_jsxs(_components.p,{children:[`A payment link can be used to securely store a payment method against a buyer’s\nprofile. To do this, you need to pass both the `,_jsx(_components.code,{children:`buyer_id`}),` and `,_jsx(_components.code,{children:`store`}),`\nparameters.`]}),`\n`,_jsxs(_components.p,{children:[`When `,_jsx(_components.code,{children:`store`}),` is set to `,_jsx(_components.code,{children:`true`}),`, the `,_jsx(_components.code,{children:`buyer_id`}),` of an existing buyer must also be\nprovided. After the payment is completed, the payment method used is\nstored and associated with that buyer.`]}),`\n`,_jsxs(_components.p,{children:[`When `,_jsx(_components.code,{children:`store`}),` is `,_jsx(_components.code,{children:`true`}),`, the payment link page only shows payment methods that can be stored,\nso some of the options you’ve configured might not appear.`]}),`\n`,_jsx(_components.p,{children:`Currently, it is not possible to use a buyer’s existing stored payment methods\nto complete a payment link.`}),`\n`,_jsx(Heading,{level:`3`,id:`zero-amount-links`,children:`Zero-amount links`}),`\n`,_jsxs(_components.p,{children:[`You can create a payment link with an `,_jsx(_components.code,{children:`amount`}),` of `,_jsx(_components.code,{children:`0`}),`. With `,_jsx(_components.code,{children:`store`}),` set to `,_jsx(_components.code,{children:`true`}),`, the link stores the buyer’s payment method. With `,_jsx(_components.code,{children:`store`}),` set to `,_jsx(_components.code,{children:`false`}),`, the link only verifies the payment method and doesn’t store it. A zero-amount link only offers payment services that support zero-amount authorization.`]}),`\n`,_jsx(Warning,{children:_jsxs(_components.p,{children:[`When `,_jsx(_components.code,{children:`buyer_id`}),` is provided, the URL of the payment link should be treated as a secret as\nit allows anyone the ability to manage payment methods for the associated buyer.`]})}),`\n`,_jsx(Heading,{level:`2`,id:`find-a-payment-link’s-transactions`,children:`Find a payment link’s transactions`}),`\n`,_jsxs(_components.p,{children:[`To list the transactions created through a payment link, call `,_jsx(_components.a,{href:`/reference/transactions/list-transactions`,children:`list transactions`}),` with the `,_jsx(_components.code,{children:`payment_link_id`}),` query parameter set to the `,_jsx(_components.code,{children:`id`}),` of the payment link.`]}),`\n`,_jsx(CodeBlock,{filename:``,numberOfLines:`1`,language:`http`,children:_jsx(_components.pre,{className:`shiki shiki-themes github-light-default dark-plus`,style:{backgroundColor:`#ffffff`,\"--shiki-dark-bg\":`#0B0C0E`,color:`#1f2328`,\"--shiki-dark\":`#D4D4D4`},language:`http`,children:_jsxs(_components.code,{language:`http`,numberOfLines:`1`,children:[_jsxs(_components.span,{className:`line`,children:[_jsx(_components.span,{style:{color:`#CF222E`,\"--shiki-dark\":`#C586C0`},children:`GET`}),_jsx(_components.span,{style:{color:`#1F2328`,\"--shiki-dark\":`#D4D4D4`},children:` /transactions?payment_link_id=09e90ace-a746-41f5-88d2-8b16335ded97`})]}),`\n`]})})}),`\n`,_jsxs(_components.p,{children:[`In the dashboard, go to `,_jsx(_components.strong,{children:`Transactions`}),` > `,_jsx(_components.strong,{children:`Payment links`}),` and open the payment link to see its transactions.`]})]})}function MDXContent(props={}){const{wrapper:MDXLayout}={..._provideComponents(),...props.components};return MDXLayout?_jsx(MDXLayout,{...props,children:_jsx(_createMdxContent,{...props})}):_createMdxContent(props)}return{default:MDXContent};function _missingMdxReference(id,component){throw new Error(`Expected `+(component?`component`:`object`)+\" `\"+id+\"` to be defined: you likely forgot to import, pass, or provide it.\")}","frontmatter":{},"scope":{"codeStyling":"system","config":{},"pageMetadata":{"title":"Payment links","sidebarTitle":"Overview","description":"Set up payment links to accept payments from your customers.","href":"/guides/features/payment-links/overview"}}},"mdxSourceWithNoJs":null},"mdxExtracts":{"tableOfContents":[{"title":"Creating a payment link","slug":"creating-a-payment-link","depth":2,"children":[]},{"title":"Set the intent","slug":"set-the-intent","depth":2,"children":[]},{"title":"Add airline data","slug":"add-airline-data","depth":2,"children":[]},{"title":"Limit the payment methods on a link","slug":"limit-the-payment-methods-on-a-link","depth":2,"children":[]},{"title":"Storing a payment method","slug":"storing-a-payment-method","depth":2,"children":[{"title":"Zero-amount links","slug":"zero-amount-links","depth":3,"children":[]}]},{"title":"Find a payment link’s transactions","slug":"find-a-payment-link’s-transactions","depth":2,"children":[]}],"codeExamples":{}},"jsLinks":["/_mintlify/custom/anglpay/3dae7fbd0bb305c9/posthog.js"],"subdomain":"anglpay","siteName":"ANGL Pay","title":"Payment links - ANGL Pay","navMaps":{"firstHrefInVersion":{},"firstHrefInLanguage":{}},"lastModified":"2026-11-11T12:45:40.126Z","originalFileLocation":"guides/features/payment-links/overview.mdx"},"headHtml":"\u003cscript data-mint-head>(function(){var d=document.documentElement,p=null;if(!p){try{p=localStorage.getItem(\"isDarkMode\")}catch(e){}if(p==='true')p='dark';else if(p==='false')p='light';if(p!=='light'\u0026\u0026p!=='dark'\u0026\u0026p!=='system')p=\"system\"}var r=p==='system'?(matchMedia(\"(prefers-color-scheme: dark)\").matches?'dark':'light'):p;d.classList.remove(r==='dark'?'light':'dark');d.classList.add(r);d.setAttribute(\"data-theme-preference\",p)})();\u003c/script>\u003cmeta data-mint-head name=\"description\" content=\"Set up payment links to accept payments from your customers.\">\u003cmeta data-mint-head name=\"application-name\" content=\"ANGL Pay\">\u003cmeta data-mint-head name=\"generator\" content=\"Mintlify\">\u003clink data-mint-head rel=\"icon\" type=\"image/png\" sizes=\"192x192\" href=\"/mintlify-assets/_mintlify/favicons/anglpay/5yw08cwQ30NBUKCc/_generated/favicon/android-chrome-192x192.png\" media=\"(prefers-color-scheme: light)\">\u003clink data-mint-head rel=\"apple-touch-icon\" type=\"image/png\" sizes=\"180x180\" href=\"/mintlify-assets/_mintlify/favicons/anglpay/5yw08cwQ30NBUKCc/_generated/favicon/apple-touch-icon.png\">\u003clink data-mint-head rel=\"icon\" type=\"image/png\" sizes=\"16x16\" href=\"/mintlify-assets/_mintlify/favicons/anglpay/5yw08cwQ30NBUKCc/_generated/favicon/favicon-16x16.png\" media=\"(prefers-color-scheme: light)\">\u003clink data-mint-head rel=\"icon\" type=\"image/png\" sizes=\"32x32\" href=\"/mintlify-assets/_mintlify/favicons/anglpay/5yw08cwQ30NBUKCc/_generated/favicon/favicon-32x32.png\" media=\"(prefers-color-scheme: light)\">\u003clink data-mint-head rel=\"shortcut icon\" type=\"image/x-icon\" href=\"/mintlify-assets/_mintlify/favicons/anglpay/5yw08cwQ30NBUKCc/_generated/favicon/favicon.ico\" media=\"(prefers-color-scheme: light)\">\u003clink data-mint-head rel=\"icon\" type=\"image/png\" sizes=\"192x192\" href=\"/mintlify-assets/_mintlify/favicons/anglpay/5yw08cwQ30NBUKCc/_generated/favicon-dark/android-chrome-192x192.png\" media=\"(prefers-color-scheme: dark)\">\u003clink data-mint-head rel=\"icon\" type=\"image/png\" sizes=\"16x16\" href=\"/mintlify-assets/_mintlify/favicons/anglpay/5yw08cwQ30NBUKCc/_generated/favicon-dark/favicon-16x16.png\" media=\"(prefers-color-scheme: dark)\">\u003clink data-mint-head rel=\"icon\" type=\"image/png\" sizes=\"32x32\" href=\"/mintlify-assets/_mintlify/favicons/anglpay/5yw08cwQ30NBUKCc/_generated/favicon-dark/favicon-32x32.png\" media=\"(prefers-color-scheme: dark)\">\u003clink data-mint-head rel=\"shortcut icon\" type=\"image/x-icon\" href=\"/mintlify-assets/_mintlify/favicons/anglpay/5yw08cwQ30NBUKCc/_generated/favicon-dark/favicon.ico\" media=\"(prefers-color-scheme: dark)\">\u003cmeta data-mint-head property=\"og:title\" content=\"Payment links - ANGL Pay\">\u003cmeta data-mint-head property=\"og:description\" content=\"Set up payment links to accept payments from your customers.\">\u003cmeta data-mint-head property=\"og:site_name\" content=\"ANGL Pay\">\u003cmeta data-mint-head property=\"og:url\" content=\"https://docs.anglpay.com/guides/features/payment-links/overview\">\u003cmeta data-mint-head property=\"og:type\" content=\"website\">\u003cmeta data-mint-head property=\"og:image\" content=\"https://anglpay.mintlify.site/_mintlify/api/og/v2?division=Payment+links\u0026amp;title=Payment+links\u0026amp;description=Set+up+payment+links+to+accept+payments+from+your+customers.\u0026amp;theme=44daab9aff68287bd9274dd5\u0026amp;signature=889edda5c0826916d367a215b9006bda6adca97534cf36be19985a3f1a31990a\">\u003cmeta data-mint-head property=\"og:image:width\" content=\"1200\">\u003cmeta data-mint-head property=\"og:image:height\" content=\"630\">\u003cmeta data-mint-head name=\"twitter:card\" content=\"summary_large_image\">\u003cmeta data-mint-head name=\"twitter:title\" content=\"Payment links - ANGL Pay\">\u003cmeta data-mint-head name=\"twitter:description\" content=\"Set up payment links to accept payments from your customers.\">\u003cmeta data-mint-head name=\"twitter:image\" content=\"https://anglpay.mintlify.site/_mintlify/api/og/v2?division=Payment+links\u0026amp;title=Payment+links\u0026amp;description=Set+up+payment+links+to+accept+payments+from+your+customers.\u0026amp;theme=44daab9aff68287bd9274dd5\u0026amp;signature=889edda5c0826916d367a215b9006bda6adca97534cf36be19985a3f1a31990a\">\u003cmeta data-mint-head name=\"twitter:image:width\" content=\"1200\">\u003cmeta data-mint-head name=\"twitter:image:height\" content=\"630\">\u003cmeta data-mint-head name=\"msapplication-config\" content=\"/mintlify-assets/_mintlify/favicons/anglpay/5yw08cwQ30NBUKCc/_generated/favicon/browserconfig.xml\">\u003cmeta data-mint-head name=\"apple-mobile-web-app-title\" content=\"ANGL Pay\">\u003cmeta data-mint-head name=\"msapplication-TileColor\" content=\"#538c53\">\u003clink data-mint-head rel=\"canonical\" href=\"https://docs.anglpay.com/guides/features/payment-links/overview\">\u003clink data-mint-head rel=\"alternate\" type=\"application/xml\" href=\"/sitemap.xml\">\u003clink data-mint-head rel=\"alternate\" type=\"text/markdown\" href=\"/guides/features/payment-links/overview.md\">\u003cscript data-mint-head type=\"application/ld+json\">{\"@context\":\"https://schema.org\",\"@graph\":[{\"@type\":\"Organization\",\"@id\":\"https://docs.anglpay.com/#organization\",\"name\":\"ANGL Pay\",\"url\":\"https://docs.anglpay.com\",\"logo\":{\"@type\":\"ImageObject\",\"url\":\"https://mintcdn.com/anglpay/HiPPSlxu3-bcuR21/assets/logos/light.svg?fit=max\u0026auto=format\u0026n=HiPPSlxu3-bcuR21\u0026q=85\u0026s=3288ab19867d2196ca039bfb1bfffa8e\"}},{\"@type\":\"WebSite\",\"@id\":\"https://docs.anglpay.com#website\",\"name\":\"ANGL Pay\",\"url\":\"https://docs.anglpay.com\",\"publisher\":{\"@id\":\"https://docs.anglpay.com/#organization\"}},{\"@type\":\"WebPage\",\"@id\":\"https://docs.anglpay.com/guides/features/payment-links/overview#webpage\",\"url\":\"https://docs.anglpay.com/guides/features/payment-links/overview\",\"name\":\"Payment links\",\"description\":\"Set up payment links to accept payments from your customers.\",\"dateModified\":\"2026-11-11T12:45:40.126Z\",\"isPartOf\":{\"@id\":\"https://docs.anglpay.com#website\"},\"breadcrumb\":{\"@id\":\"https://docs.anglpay.com/guides/features/payment-links/overview#breadcrumb\"}},{\"@type\":\"BreadcrumbList\",\"@id\":\"https://docs.anglpay.com/guides/features/payment-links/overview#breadcrumb\",\"itemListElement\":[{\"@type\":\"ListItem\",\"position\":1,\"name\":\"Features\",\"item\":\"https://docs.anglpay.com/guides/features/3ds/overview\"},{\"@type\":\"ListItem\",\"position\":2,\"name\":\"Payment links\",\"item\":\"https://docs.anglpay.com/guides/features/payment-links/overview\"}]},{\"@type\":[\"Article\",\"TechArticle\"],\"@id\":\"https://docs.anglpay.com/guides/features/payment-links/overview#article\",\"headline\":\"Payment links\",\"name\":\"Payment links\",\"description\":\"Set up payment links to accept payments from your customers.\",\"url\":\"https://docs.anglpay.com/guides/features/payment-links/overview\",\"mainEntityOfPage\":{\"@id\":\"https://docs.anglpay.com/guides/features/payment-links/overview#webpage\"},\"dateModified\":\"2026-11-11T12:45:40.126Z\",\"publisher\":{\"@id\":\"https://docs.anglpay.com/#organization\"},\"isPartOf\":{\"@id\":\"https://docs.anglpay.com#website\"}}]}\u003c/script>\u003cscript data-mint-head type=\"application/ld+json\">{\"@context\":\"https://schema.org\",\"@type\":\"WebSite\",\"name\":\"ANGL Pay\",\"publisher\":{\"@type\":\"Organization\",\"name\":\"ANGL Pay\"},\"provider\":{\"@type\":\"Organization\",\"name\":\"Mintlify\",\"url\":\"https://mintlify.com\"}}\u003c/script>","agentPointerHref":"/guides/features/payment-links/overview.md","siteName":"ANGL Pay","nav":{"global":null,"tabs":[{"tab":"Build","icon":"credit-card","groups":[{"group":"Get started","icon":"compass","pages":[{"sidebarTitle":"Overview","title":"Build with AnglPay","mode":"wide","href":"/guides/get-started"},{"title":"Accept payments on the web","sidebarTitle":"Web payments","href":"/guides/payments/web"},{"title":"Accept payments on mobile","sidebarTitle":"Mobile payments","href":"/guides/payments/mobile"}]},{"group":"Integration guides","icon":"code","pages":[{"group":"Embed","pages":[{"group":"Web","pages":[{"title":"Embed","sidebarTitle":"Introduction","href":"/guides/payments/embed/quick-start/overview"},{"title":"Creating an API key for use with Embed","sidebarTitle":"API keys","href":"/guides/payments/embed/quick-start/key"},{"title":"Generating tokens for authentication","sidebarTitle":"Authentication","href":"/guides/payments/embed/quick-start/sdks"},{"title":"Adding Embed","sidebarTitle":"Embed checkout","href":"/guides/payments/embed/quick-start/embed"},{"title":"Inspecting transactions","sidebarTitle":"Transaction inspection","href":"/guides/payments/embed/quick-start/inspect"},{"title":"Going live","sidebarTitle":"Going live","href":"/guides/payments/embed/quick-start/live"},{"title":"Digital wallets in Embed","sidebarTitle":"Digital wallets","href":"/guides/payments/embed/digital-wallets"},{"title":"Embed events","sidebarTitle":"Events","href":"/guides/payments/embed/events"},{"title":"Embed localization","sidebarTitle":"Locales","href":"/guides/payments/embed/locale"},{"title":"Embed Theming","sidebarTitle":"Theming","href":"/guides/payments/embed/theming"},{"title":"Embed options","sidebarTitle":"Options","mode":"wide","href":"/guides/payments/embed/options"},{"title":"In-app browsers with Embed","sidebarTitle":"In-app browsers","href":"/guides/payments/embed/in-app-browsers"},{"title":"Common issues with Embed","sidebarTitle":"Common issues","href":"/guides/payments/embed/common-issues"}]},{"group":"Android","pages":[{"title":"Android SDK","sidebarTitle":"Introduction","href":"/guides/payments/android/quick-start/overview"},{"title":"Creating an API key for use with Android","sidebarTitle":"API keys","href":"/guides/payments/android/quick-start/key"},{"title":"Generating tokens for authentication","sidebarTitle":"Authentication","href":"/guides/payments/android/quick-start/sdks"},{"title":"Installing the Android SDK","sidebarTitle":"SDK installation","href":"/guides/payments/android/quick-start/android"},{"title":"Creating transactions","sidebarTitle":"Transactions","href":"/guides/payments/android/quick-start/transact"},{"title":"Google Pay on Android","sidebarTitle":"Google Pay","href":"/guides/payments/android/google-pay"},{"title":"Android events","sidebarTitle":"Events","href":"/guides/payments/android/events"},{"title":"Android options","sidebarTitle":"Options","mode":"wide","href":"/guides/payments/android/options"}]},{"group":"iOS","pages":[{"title":"iOS SDK","sidebarTitle":"Introduction","href":"/guides/payments/ios/quick-start/overview"},{"title":"Creating an API key for use with iOS","sidebarTitle":"API keys","href":"/guides/payments/ios/quick-start/key"},{"title":"Generating tokens for authentication","sidebarTitle":"Authentication","href":"/guides/payments/ios/quick-start/sdks"},{"title":"Installing the iOS SDK","sidebarTitle":"SDK installation","href":"/guides/payments/ios/quick-start/ios"},{"title":"Creating transactions","sidebarTitle":"Transactions","href":"/guides/payments/ios/quick-start/transact"},{"title":"Apple Pay on iOS","sidebarTitle":"Apple Pay","href":"/guides/payments/ios/apple-pay"},{"title":"iOS events","sidebarTitle":"Events","href":"/guides/payments/ios/events"},{"title":"iOS options","sidebarTitle":"Options","mode":"wide","href":"/guides/payments/ios/options"}]},{"group":"React Native","pages":[{"title":"React Native SDK","sidebarTitle":"Introduction","href":"/guides/payments/react-native/quick-start/overview"},{"title":"Creating an API key for use with React Native","sidebarTitle":"API keys","href":"/guides/payments/react-native/quick-start/key"},{"title":"Generating tokens for authentication","sidebarTitle":"Authentication","href":"/guides/payments/react-native/quick-start/sdks"},{"title":"Installing the React Native SDK","sidebarTitle":"SDK installation","href":"/guides/payments/react-native/quick-start/embed"},{"title":"Creating transactions","sidebarTitle":"Transactions","href":"/guides/payments/react-native/quick-start/transact"},{"title":"Apple Pay on React Native","sidebarTitle":"Apple Pay","href":"/guides/payments/react-native/apple-pay"},{"title":"Google Pay on React Native","sidebarTitle":"Google Pay","href":"/guides/payments/react-native/google-pay"},{"title":"React Native events","sidebarTitle":"Events","href":"/guides/payments/react-native/events"},{"title":"React Native options","sidebarTitle":"Options","mode":"wide","href":"/guides/payments/react-native/options"}]}]},{"group":"Secure Fields","pages":[{"title":"Secure Fields","sidebarTitle":"Introduction","href":"/guides/payments/secure-fields/quick-start/overview"},{"title":"Creating an API key for use with Secure Fields","sidebarTitle":"API keys","href":"/guides/payments/secure-fields/quick-start/key"},{"title":"Creating checkout sessions","sidebarTitle":"Checkout sessions","href":"/guides/payments/secure-fields/quick-start/sdks"},{"title":"Adding secure fields","sidebarTitle":"Secure fields","href":"/guides/payments/secure-fields/quick-start/embed"},{"title":"Creating transactions","sidebarTitle":"Transactions","href":"/guides/payments/secure-fields/quick-start/transact"},{"title":"Secure Fields and 3DS","sidebarTitle":"3DS","href":"/guides/payments/secure-fields/three-d-secure"},{"title":"Secure Fields with stored cards","sidebarTitle":"Stored cards","href":"/guides/payments/secure-fields/stored-cards"},{"title":"Secure Fields theming","sidebarTitle":"Theming","href":"/guides/payments/secure-fields/theming"},{"title":"Secure Fields events","sidebarTitle":"Events","href":"/guides/payments/secure-fields/events"},{"title":"Secure Fields UX options","sidebarTitle":"UX options","href":"/guides/payments/secure-fields/ux-options"}]},{"group":"Direct API","pages":[{"title":"Direct API","sidebarTitle":"Introduction","href":"/guides/payments/direct-api/quick-start/overview"},{"title":"Authentication","sidebarTitle":"Authentication","href":"/guides/payments/direct-api/quick-start/key"},{"title":"Listing payment options","sidebarTitle":"Payment options","href":"/guides/payments/direct-api/quick-start/payment-options"},{"title":"Creating transactions","sidebarTitle":"Transactions","href":"/guides/payments/direct-api/quick-start/transaction"},{"title":"Handling redirects","sidebarTitle":"Redirects","href":"/guides/payments/direct-api/quick-start/handle-redirect"},{"title":"Getting transaction results","sidebarTitle":"Transaction results","href":"/guides/payments/direct-api/quick-start/status"},{"title":"PayPal via the API","sidebarTitle":"PayPal","href":"/guides/payments/direct-api/paypal"}]},{"group":"Native SDKs","pages":[{"title":"Native Mobile SDKs","sidebarTitle":"Overview","href":"/guides/payments/native/overview"},{"title":"Create an API key","sidebarTitle":"API keys","href":"/guides/payments/native/key"},{"title":"Generating tokens for authentication","sidebarTitle":"Authentication","href":"/guides/payments/native/sdks"},{"title":"Vaulting card data","sidebarTitle":"Vaulting","href":"/guides/payments/native/vault"},{"title":"Adding 3DS authentication","sidebarTitle":"3DS","href":"/guides/payments/native/3ds"},{"sidebarTitle":"Get card details","title":"Card details","href":"/guides/payments/native/get-card-details"},{"sidebarTitle":"Payment options","title":"List payment options","href":"/guides/payments/native/list-payment-options"},{"sidebarTitle":"Buyer payment methods","title":"List buyer payment methods","href":"/guides/payments/native/list-buyer-payment-methods"},{"title":"SDK Response Reference","sidebarTitle":"Responses","href":"/guides/payments/native/responses"}]},{"group":"Agentic Development Kit","pages":[{"title":"Agentic Development Kit (ADK)","sidebarTitle":"Overview","href":"/guides/payments/adk/overview"},{"group":"ChatGPT","pages":[{"title":"ChatGPT ADK","sidebarTitle":"Introduction","href":"/guides/payments/chatgpt-app/overview"},{"title":"Architecture","sidebarTitle":"Architecture","href":"/guides/payments/chatgpt-app/architecture"},{"title":"Set up the project","sidebarTitle":"Setup","href":"/guides/payments/chatgpt-app/setup"},{"title":"Build the MCP server","sidebarTitle":"MCP server","href":"/guides/payments/chatgpt-app/mcp-server"},{"title":"Build the widgets","sidebarTitle":"Widgets","href":"/guides/payments/chatgpt-app/widgets"},{"title":"Integrate Gr4vy Embed","sidebarTitle":"Gr4vy Embed","href":"/guides/payments/chatgpt-app/gr4vy-embed"},{"title":"Deploy to ChatGPT","sidebarTitle":"Deployment","href":"/guides/payments/chatgpt-app/deployment"}]}]},{"group":"Vaulting","pages":[{"title":"Vaulting","sidebarTitle":"Overview","href":"/guides/features/vault-forwarding/overview"},{"title":"Tokenize a card","sidebarTitle":"Tokenize","href":"/guides/features/vault-forwarding/tokenize"},{"title":"Provision a PSP token","sidebarTitle":"PSP tokens","href":"/guides/features/vault-forwarding/psp-tokens"},{"title":"Vault Forward card data to API endpoint","sidebarTitle":"Forward to endpoint","href":"/guides/features/vault-forwarding/forward"}]}]},{"group":"Best Practices","icon":"lightbulb","pages":[{"title":"Best practices","href":"/guides/best-practices/overview"},{"title":"Identifiers \u0026 reconciliation","sidebarTitle":"IDs \u0026 reconciliation","href":"/guides/ids"},{"title":"Idempotent requests","href":"/guides/api/idempotent-requests"},{"sidebarTitle":"Timeouts","title":"Handling transaction timeout","mode":"wide","href":"/guides/timeouts"}]},{"group":"Resources","icon":"toolbox","pages":[{"title":"Command Line Interface (CLI)","sidebarTitle":"CLI","href":"/guides/tools/cli"},{"title":"Postman Collection","sidebarTitle":"Postman","href":"/guides/tools/postman"},{"title":"OpenAPI 3.1.0 Specification","sidebarTitle":"OpenAPI","href":"/guides/api/openapi"}]},{"group":"Features","icon":"sliders","pages":[{"group":"3-D Secure","pages":[{"title":"3-D Secure","sidebarTitle":"Overview","href":"/guides/features/3ds/overview"},{"title":"3-D Secure Setup","sidebarTitle":"Setup","href":"/guides/features/3ds/setup"},{"title":"Setup 3DS card schemes","sidebarTitle":"Schemes","href":"/guides/features/3ds/schemes"},{"title":"3-D Secure with multiple connections","sidebarTitle":"Multiple connections","href":"/guides/features/3ds/multiple-connections"},{"title":"3-D Secure in Embed","sidebarTitle":"Embed","href":"/guides/features/3ds/embed"},{"title":"Hosted 3-D Secure","sidebarTitle":"Hosted","href":"/guides/features/3ds/hosted"},{"title":"Native 3-D Secure","sidebarTitle":"Native","href":"/guides/features/3ds/native"},{"title":"Pass-through External 3-D Secure data","sidebarTitle":"External","href":"/guides/features/3ds/external"},{"title":"3DS authentication results","sidebarTitle":"Results","href":"/guides/features/3ds/statuses"},{"title":"3-D Secure testing","sidebarTitle":"Testing","href":"/guides/features/3ds/testing"},{"title":"3DS Scenarios","sidebarTitle":"Scenarios","href":"/guides/features/3ds/scenarios"}]},{"group":"Account updater","pages":[{"title":"Account Updater","sidebarTitle":"Overview","href":"/guides/features/account-updater/overview"},{"title":"Manual account updates","sidebarTitle":"Manual updates","href":"/guides/features/account-updater/integration"},{"title":"Scheduled account updates","sidebarTitle":"Scheduled updates","href":"/guides/features/account-updater/scheduler"},{"title":"Real time account updates","sidebarTitle":"Real time updates","href":"/guides/features/account-updater/real-time"}]},{"group":"AFTs","pages":[{"title":"Account funding transactions","sidebarTitle":"Overview","href":"/guides/features/account-funding-transactions/overview"}]},{"group":"Anti-fraud","pages":[{"title":"Anti-fraud","sidebarTitle":"Overview","href":"/guides/features/anti-fraud/overview"},{"title":"Anti-fraud setup","sidebarTitle":"Setup","href":"/guides/features/anti-fraud/setup"},{"title":"Silent mode","sidebarTitle":"Silent mode","href":"/guides/features/anti-fraud/silent-mode"},{"title":"Automatic anti-fraud device fingerprinting","sidebarTitle":"Fingerprints","href":"/guides/features/anti-fraud/fingerprint"},{"title":"Anti-fraud reviews","sidebarTitle":"Reviews","href":"/guides/features/anti-fraud/reviews"},{"title":"Anti-fraud simulator","sidebarTitle":"Simulator","href":"/guides/features/anti-fraud/simulator"}]},{"group":"Apple Pay","pages":[{"title":"Apple Pay","sidebarTitle":"Overview","href":"/guides/features/apple-pay/overview"},{"title":"Apple Pay on web with Embed","sidebarTitle":"Web with Embed","href":"/guides/features/apple-pay/web"},{"title":"Apple Pay on web without Embed","sidebarTitle":"Web without Embed","href":"/guides/features/apple-pay/web-without-sdk"},{"title":"Apple Pay on iOS with the SDK","sidebarTitle":"iOS with SDK","href":"/guides/features/apple-pay/ios"},{"title":"Apple Pay on iOS without the SDK","sidebarTitle":"iOS without SDK","href":"/guides/features/apple-pay/ios-without-sdk"},{"title":"Decrypted Apple Pay tokens","sidebarTitle":"Decrypted tokens","href":"/guides/features/apple-pay/decrypted-tokens"}]},{"group":"Click to Pay","pages":[{"title":"Click to Pay","sidebarTitle":"Overview","href":"/guides/features/click-to-pay/overview"},{"title":"Click to Pay Setup","sidebarTitle":"Setup","href":"/guides/features/click-to-pay/setup"},{"title":"Customer Authentication Module (CAM)","sidebarTitle":"Customer Authentication","href":"/guides/features/click-to-pay/cam"},{"title":"Token Authentication Service (TAS)","sidebarTitle":"Token Authentication","href":"/guides/features/click-to-pay/tas"}]},{"group":"Gift Cards","pages":[{"title":"Gift Cards","sidebarTitle":"Overview","href":"/guides/features/gift-cards/overview"},{"title":"Gift card simulator","sidebarTitle":"Simulator","href":"/guides/features/gift-cards/simulator"}]},{"group":"Google Pay","pages":[{"title":"Google Pay","sidebarTitle":"Overview","href":"/guides/features/google-pay/overview"},{"title":"Google Pay on web with Embed","sidebarTitle":"Web with Embed","href":"/guides/features/google-pay/web"},{"title":"Google Pay on web without Embed","sidebarTitle":"Web without Embed","href":"/guides/features/google-pay/web-without-sdk"},{"title":"Google Pay on Android with the SDK","sidebarTitle":"Android with SDK","href":"/guides/features/google-pay/mobile"},{"title":"Google Pay on Android without the SDK","sidebarTitle":"Android without SDK","href":"/guides/features/google-pay/mobile-without-sdk"},{"title":"Decrypted Google Pay tokens","sidebarTitle":"Decrypted tokens","href":"/guides/features/google-pay/decrypted-tokens"}]},{"group":"Guest checkout","pages":[{"title":"Guest checkout","sidebarTitle":"Overview","href":"/guides/features/guest-checkout/overview"},{"title":"Linking guests buyer details","sidebarTitle":"Buyer linking","href":"/guides/features/guest-checkout/linking"}]},{"group":"Incremental authorization","pages":[{"title":"Incremental authorization","sidebarTitle":"Overview","href":"/guides/features/incremental-authorization/overview"}]},{"group":"Multi captures","pages":[{"title":"Multi captures","sidebarTitle":"Overview","href":"/guides/features/multi-captures/overview"}]},{"group":"Network tokens","pages":[{"title":"Network tokens","sidebarTitle":"Overview","href":"/guides/features/network-tokens/overview"},{"title":"Network token implementation","sidebarTitle":"Implementation","href":"/guides/features/network-tokens/implementation"},{"title":"Network token lifecycle management","sidebarTitle":"Lifecycle","href":"/guides/features/network-tokens/lifecycle"},{"title":"Network Token Testing","sidebarTitle":"Testing","href":"/guides/features/network-tokens/testing"},{"title":"Network token pass through","sidebarTitle":"Pass through","href":"/guides/features/network-tokens/passthrough"}]},{"group":"Partial auth","pages":[{"title":"Partial authorization","sidebarTitle":"Overview","href":"/guides/features/partial-authentication/overview"}]},{"group":"Bank payments","pages":[{"title":"Bank payments","sidebarTitle":"Overview","href":"/guides/features/pay-by-bank/overview"}]},{"group":"Payment facilitators","pages":[{"title":"Payment facilitators","sidebarTitle":"Overview","description":"Process card payments as a payment facilitator (PayFac) by sending sub-merchant details to supported payment services.","href":"/guides/features/payment-facilitators/overview"}]},{"group":"Payment links","pages":[{"title":"Payment links","sidebarTitle":"Overview","href":"/guides/features/payment-links/overview"},{"title":"Sharing the payment link","sidebarTitle":"Sharing","description":null,"href":"/guides/features/payment-links/sharing"},{"title":"Payment link expiration and statuses","sidebarTitle":"Expiration \u0026 Status","href":"/guides/features/payment-links/statuses"}]},{"group":"Payouts","pages":[{"title":"Payouts","sidebarTitle":"Introduction","href":"/guides/features/payouts/overview"}]},{"group":"Paze","pages":[{"title":"Paze","sidebarTitle":"Overview","href":"/guides/features/paze/overview"},{"title":"Set up Paze","sidebarTitle":"Set up","href":"/guides/features/paze/setup"},{"title":"Paze on web","sidebarTitle":"Web setup","href":"/guides/features/paze/web"},{"title":"Paze on mobile","sidebarTitle":"Mobile setup","href":"/guides/features/paze/mobile"}]},{"group":"PSP Tokenization","pages":[{"title":"PSP Tokenization","sidebarTitle":"Overview","href":"/guides/features/psp-tokenization/overview"}]},{"group":"Push payments","pages":[{"title":"Push payments","sidebarTitle":"Overview","href":"/guides/features/push-payments/overview"},{"title":"Push payments and Embed","sidebarTitle":"Embed","href":"/guides/features/push-payments/embed"}]},{"group":"Reauthorization","pages":[{"title":"Reauthorization","sidebarTitle":"Overview","href":"/guides/features/reauthorization/overview"}]},{"group":"Recurring payments","pages":[{"title":"Recurring payments","sidebarTitle":"Overview","href":"/guides/features/recurring-payments/overview"},{"title":"Common scenarios","href":"/guides/features/recurring-payments/scenarios"},{"title":"Recurring transactions with Embed","sidebarTitle":"In Embed","href":"/guides/features/recurring-payments/embed"},{"title":"Open-loop versus closed-loop","sidebarTitle":"Open or Closed-loop","href":"/guides/features/recurring-payments/open-loop"},{"title":"Recurring payments with network tokens","sidebarTitle":"Network tokens","href":"/guides/features/recurring-payments/network-tokens"},{"title":"Mastercard Transaction Link Identifier (TLID)","sidebarTitle":"Mastercard TLID","href":"/guides/features/recurring-payments/mastercard-tlid"}]},{"group":"Refund ingestion","pages":[{"title":"Refund ingestion","sidebarTitle":"Overview","href":"/guides/features/refund-ingestion/overview"}]},{"group":"Scheme Cards","pages":[{"title":"Card fingerprints","sidebarTitle":"Card fingerprints","href":"/guides/features/cards/fingerprints"},{"title":"Payment account references","sidebarTitle":"Payment account references","href":"/guides/features/cards/payment-account-reference"}]},{"group":"Shipment tracking","pages":[{"title":"Shipment tracking","sidebarTitle":"Overview","href":"/guides/features/shipment-tracking/overview"}]},{"group":"Simulators","pages":[{"title":"Transaction simulators","sidebarTitle":"Overview","href":"/guides/features/simulators/overview"},{"title":"Transaction simulator webhooks","sidebarTitle":"Webhooks","href":"/guides/features/simulators/webhooks"}]},{"group":"Vault Forwarding","pages":[{"title":"Enable a Vault Forward endpoint","sidebarTitle":"Enable endpoint","href":"/guides/features/vault-forwarding/enable"},{"title":"Vault Forward card data from a checkout session","sidebarTitle":"CVV \u0026 Secure Fields","href":"/guides/features/vault-forwarding/checkout-sessions"},{"title":"Forward 3DS authentication data via Vault Forward","sidebarTitle":"3DS forwarding","href":"/guides/features/vault-forwarding/3ds"},{"title":"Forward network tokens via Vault Forward","sidebarTitle":"Network tokens","href":"/guides/features/vault-forwarding/network-tokens"},{"group":"Advanced authentication","pages":[{"title":"Advanced authentication for Vault Forward","sidebarTitle":"Overview","href":"/guides/features/vault-forwarding/authentication"},{"title":"Advanced authentication for Visa","sidebarTitle":"Visa","href":"/guides/features/vault-forwarding/visa"}]}]},{"group":"Webhooks","pages":[{"title":"Webhooks","sidebarTitle":"Introduction","href":"/guides/features/webhooks/overview"},{"title":"Webhook payload","sidebarTitle":"Payload","href":"/guides/features/webhooks/payload"},{"title":"Webhook events","sidebarTitle":"Events","mode":"wide","href":"/guides/features/webhooks/events"},{"title":"Technical webhook considerations","sidebarTitle":"Technical considerations","href":"/guides/features/webhooks/technical-considerations"},{"title":"Webhook signatures","sidebarTitle":"Signatures","href":"/guides/features/webhooks/signatures"}]}]},{"group":"Other","pages":[{"group":"Statuses","pages":[{"title":"Transaction statuses","sidebarTitle":"Transactions","href":"/guides/api/statuses/transactions"},{"title":"Payment method statuses","sidebarTitle":"Payment methods","href":"/guides/api/statuses/payment-methods"}]}]}]},{"tab":"Dashboard","icon":"circle-user","pages":[{"title":"Dashboard","href":"/guides/dashboard/overview"}]},{"tab":"Connections","icon":{"style":"light","name":"circle-nodes"},"pages":[{"title":"Connections","href":"/connections/payments/overview"}]},{"tab":"Custom Connectors","icon":"plug","hidden":true,"pages":[{"title":"Custom Connectors","href":"/guides/features/custom-connectors/overview"}]},{"tab":"Connector Requirements","icon":"clipboard-check","hidden":true,"pages":[{"title":"Connector Requirements","href":"/partners/connector-requirements/overview"}]},{"tab":"External Apps","icon":"puzzle-piece","hidden":true,"pages":[{"title":"External Apps","href":"/partners/external-apps"}]},{"tab":"API Reference","icon":{"style":"light","name":"square-terminal"},"pages":[{"title":"API Reference","href":"/guides/api/authentication"}]},{"tab":"Updates","icon":"bullhorn","pages":[{"title":"Updates","href":"/updates"}]}]},"basePath":"","title":"Payment links - ANGL Pay","buildId":"dpl_5joLUXmnJgwqjrHAS4dxZrQTdxgh","deploymentId":"dpl_5joLUXmnJgwqjrHAS4dxZrQTdxgh","dynamics":["a74be98ba7"],"chunks":["zoom-image-lightbox-B3yYlvdS.js","lightbox-handle-r17bVUz3.js"]}